We’ve been doing a bit more blacksmithing and the arrangement of the forge on my sawbenches has always been a bit troublesome. They are wood, so they have a tendency to burn. They are also low, so I have to stoop to see in the forge. I’m getting older and don’t stoop so good anymore. It was also taking me half an hour to get all the forge stuff out, and another half hour to put it all away. It was time for an improvement.
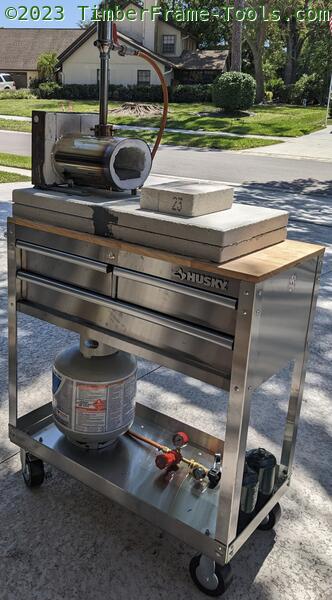
I reviewed all the mobile carts available and decided on the Husky 36″ Utility cart with 3 drawers and a wood top in Stainless Steel. I chose this cart for a few reasons.
- It was the right length and depth (36″ x 17″) to accommodate my propane forge and give room for material to stick out.
- It had as many drawers as possible, while still having room for a 20lb propane tank underneath.
- The wheels were bigger and had better brakes than others in the category.
- It is stainless steel. It does come in painted versions but I knew the heat from the forge would soon blister the paint, so I opted for stainless steel
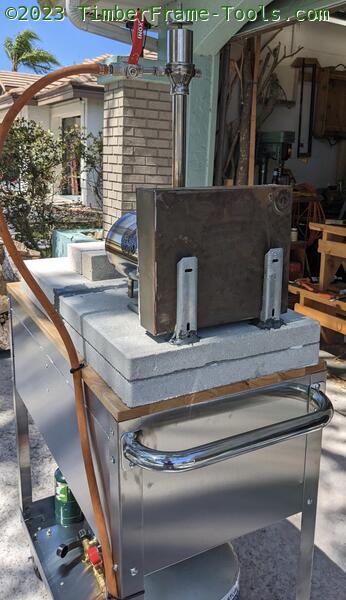
I put two layers of 16″ square 2″ thick pavers on the top and secured them with silicone. This should protect the wood top from the heat of the forge.
Here is the full list of parts that make up the forge cart
- Husky 36″ utility cart in stainless steel
- Simmond Store Forge – single burner
- four 16″ x 16″ x 2″ concrete tiles from home center
- one tube silicone calk for sticking the tiles to the top of the cart and to each other. Ordinary silicon caulk should be high temp enough if not in direct line from forge.
- one tube high heat silicone sealant to fill the crack between the two sets of blocks. If you don’t fill it, the heat from the forge will burrow down through the crack and burn the top.
- four Lynn Manufacturing Insulating Fire Brick 2.5″ x 4.5″ x 9″ I used two and a half of these to create the back wall for the forge and that left one and a half for rests or shields for the front.
- two steel shelf brackets secured to the top set of pavers. This keeps the back wall of the forge from falling over, but allows removal if you need to have something sticking out both ends of the forge.
- A few zip ties to control the gas line and keep it out of the way of the forge
- A 20 lb propane tank
Now all our blacksmithing gear is in one place, so we can roll it out into the driveway, then roll out the anvil and we are ready to go pound on some iron.