I have young a chocolate Lab that often need to be confined to one room or another and I heat my home with a propane stove so that requires that door be open to allow the heat to flow throughout the house. For a while we used baby gates to restrict the dog to one room of the house or another. Those were kind of a pain to move and put in place so I chose to convert many of my pine six panel doors into Dutch doors, so that closing the bottom could confine the dog yet leave the top unobstructed to allow the heat to migrate.
In general the plan worked out great. Here are a few of the details and how I did it.
First I marked out where the doors would have to be cut in order to leave enough of the main stile (the cross piece where the door knob resides) both above the cut and below the cut to have it still be solid enough to maintain the strength of the door and allow the knob to remain on the lower door. Once I determined where those would be, I had to add 2 hinges to each door on each side of where the cut would be. (it is easier to do the hinges while the door is still one unit).
I marked the hinges on the door, then used a 1″ Chisel and a router plane to mortise the hinge into the door. It doesn’t take long with that method, but an electric router could have done the job too. With the hinges mounted on the door, I put mounted the door back into the frame with original two hinges and was able to swing the new hinges into place to mark their location on the door jam. Unfortunately I couldn’t use the router plane as the trim on the jam got in the way, so I had to do it all with the chisel. It worked out fine.
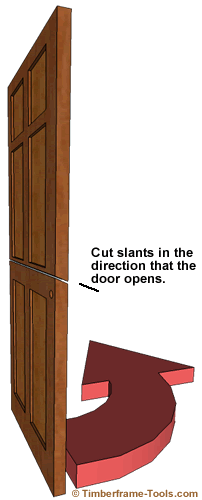
 Next I removed the door from the frame and prepared to make the cut. The cut itself should be tilted by roughly 20 degrees toward the direction that the door opens. This ensures that when the lower portion of the door is pushed open, the upper half must go with it … otherwise it would look like a comedy routine from the Three Stooges every time someone went to open the door…WHAM.
I cut the door with a circular saw tipped to 20 degrees and used a clamping saw guide to make certain the cut was straight. It would really stand out if this was crooked…so measure twice, eyeball to make sure it looks okay, make sure is leaves room to clear the door knob, measure again to be sure, make sure you are tilted in the right direction…then proceed with cut.
Cleaning up and softening the edges with a block plane helped make the edge more comfortable to the hand.
Fortunately I had finished these doors years ago with a mixture of blonde shellac and boiled linseed oil. They have a great patina and an even better feel to them in a finish that is pretty durable and does not turn white if scratched by something (doors always end up with dings and scratches over the years). Unfortunately the new cut was pretty white compared to the rest of the door but the patina on the rest of the door came real close to matching the color of orange shellac. Sp I mixed up some orange shellac with linseed oil (roughly 50/50) and proceeded to rub some into the new edges.
Then it was time to re-mount the doors.
 I added a simple brass sliding bolt lock near the handle so that the upper portion can be locked to the lower portion if needed. The gap between the two halves of the door is equal the the width of the saw blade used. I used a standard blade. Too keep the two halves from touching and making noise when closing the entire door, I put a little bit of adhesive backed foam (weather stripping) to the under side of the top door. It is just enough to keep them from chattering as the door is closed.
And just to demonstrate an interesting animation of the layout of the cut using an animation I created in Sketch-up…
I am completely happy with how they look, and how they function. No more plastic baby gates!!!