The following are the chief means by which pieces of wood are fastened together: nails, screws, bolts, plates, dowels, glue, hinges, and locks.
NAILS
Nails, Fig. 226, may be classified according to the material of which they are made; as, steel, iron, copper, and brass. Iron nails may be galvanized to protect them from rust. Copper and brass nails are used where they are subject to much danger of corrosion, as in boats.
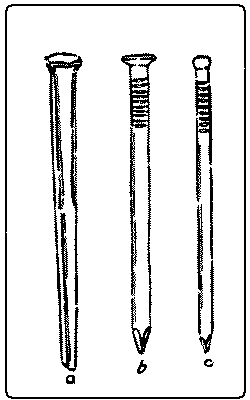
| Fig. 226. |
| a. Cut nail, common. |
| b. Flat-head wire nail, No. 1, common. |
| c. Finishing nail, or brad. |
Nails may also be classified according to the process of manufacture; as, cut nails, wrought nails, and wire nails. Cut nails are cut from a plate of metal in such a way that the width of the nail is equal to the thickness of the plate, and the length of the nail to the width of the plate. In the third dimension, the nail is wedge-shaped, thin at the point and thick at the head. Unless properly driven, such nails are likely to split the wood, but if properly driven they are very firm. In driving, the wedge should spread with and not across the grain.
Wrought nails are worked into shape from hot steel, and have little or no temper, so that they can be bent over without breaking, as when clinched. Horseshoe- and trunk-nails are of this sort. They are of the same shape as cut nails.
Wire nails are made from drawn steel wire, and are pointed, headed, and roughened by machinery. They are comparatively cheap, hold nearly if not quite as well as cut nails, which they have largely displaced, can be bent without breaking, and can be clinched.
Nails are also classified according to the shape of their heads; as, common or flat-heads, and brads or finishing nails. Flat-heads are used in ordinary work, where the heads are not to be sunk in the wood or “set.”
Some nails get their names from their special uses; as, shingle-nails, trunk-nails, boat-nails, lath-nails, picture-nails, barrel-nails, etc.
The size of nails is indicated by the length in inches, and by the size of the wire for wire nails. The old nomenclature for cut nails also survives, in which certain numbers are prefixed to “penny.” For example, a threepenny nail is 1¼” long, a fourpenny nail is 1½” long, a fivepenny nail is 1¾” long, a sixpenny nail is 2″ long. In other words, from threepenny to tenpenny ¼” is added for each penny, but a twelvepenny nail is 3¼” long, a sixteenpenny nail is 3½” long, a twentypenny nail is 4″ long. This is explained as meaning that “tenpenny” nails, for example, cost tenpence a hundred. Another explanation is that originally 1000 of such nails weighed a pound. The size of cut nails is usually still so indicated. Nails are sold by the pound.
The advantages of nails are that they are quickly and easily applied, they are strong and cheap, and the work can be separated, tho with difficulty. The disadvantages are the appearance and, in some cases, the insecurity.
The holding power of nails may be increased by driving them into the wood at other than a right angle, especially where several nails unite two pieces of wood. By driving some at one inclination and some at another, they bind the pieces of wood together with much greater force than when driven in straight.
The term brads was once confined to small finishing nails, but is now used for all finishing nails, in distinction from common or flat-headed nails. The heads are made round instead of flat so that they may be set easily with a nailset and the hole filled with a plug, or, where the wood is to be painted, with putty. They are used for interior finishing and other nice work.
Tacks, Fig. 227, vary in size and shape according to their use; as, flat-headed, gimp, round-headed, and double-pointed or matting tacks, a sort of small staple. Their size is indicated by the word “ounce.” For example, a two-ounce tack is ¼” long, a three-ounce tack is ⅜” long, a four-ounce tack is 7⁄16” long, a six-ounce tack is ½” long, etc. This term once meant the number of ounces of iron required to make 1000 tacks.
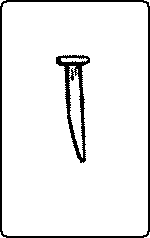
Fig. 227. Tack.
Tacks are useful only in fastening to wood thin material, such as veneers, textiles, leather, matting, tin, etc. Tinner’s tacks, which are used for clinching, are commonly called clinch-nails. Wire tacks, altho made, are not so successful as cut tacks because they lack a sharp point, which is essential.
Corrugated fasteners, Fig. 228, or fluted nails, are used to fasten together two pieces of wood by driving the fastener so that one-half of it will be on each side of the joint. Their size is indicated by the length and the number of corrugations, as ½”, four. They are often useful where nails are impracticable.
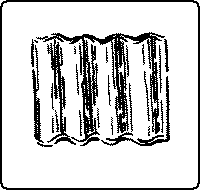
Fig. 228. Corrugated Fastener.
Glaziers’ points are small, triangular pieces of zinc, used to fasten glass into sashes.
SCREWS
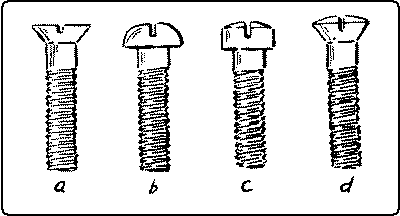
(a) Wood-screws, Fig. 229, may be classified by the material of which they are made; as, steel or brass. Steel screws may be either bright,—the common finish,—blued by heat or acid to hinder rusting, tinned, or bronzed. Brass screws are essential wherever rust would be detrimental, as in boats.
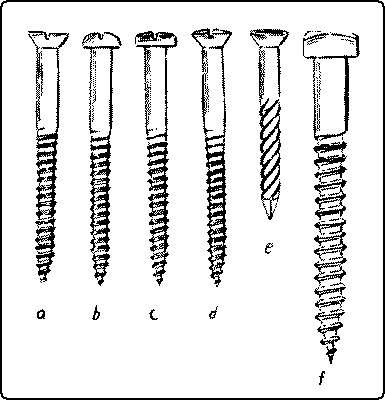
| Fig. 229. |
| a. Flat-head Wood-screw. |
| b. Round-head Wood-screw. |
| c. Fillister-head Wood-screw. |
| d. Oval-countersunk-head Wood-screw. |
| e. Drive-screw. |
| f. Square-head (lag- or coach-) Screw. |
(b) Screws are also classified by shape; as, flat-headed, round-headed, fillister-headed, oval-countersunk-headed, and square-headed screws. Flat-heads are most commonly used. There are also special shapes for particular purposes. Round-heads may be used either for decoration or where great drawing power is desirable. In the latter case, washers are commonly inserted under the heads to prevent them from sinking into the wood. Oval-heads are used decoratively, the head filling the countersunk hole, as with flat-heads, and projecting a trifle besides. They are much used in the interior finish of railway cars. They are suitable for the strap hinges of a chest.
The thread of the screw begins in a fine point so that it may penetrate the wood easily where no hole has been bored as is often the case in soft wood. The thread extends about two-thirds the length of the screw. Any longer thread would only weaken the screw where it most needs strength, near the head, and it does not need friction with the piece thru which it passes.
The size of screws is indicated by their length in inches, and by the diameter of the wire from which they are made, using the standard screw-gage, Fig. 220. They vary in size from No. 0 (less than 1⁄16“) to No. 30 (more than 7⁄16“) in diameter, and in length from ¼” to 6″.
The following is a good general rule for the use of screws: make the hole in the piece thru which the screw passes, large enough for the screw to slip thru easily. Countersink this hole enough to allow the head to sink flush with the surface. Make the hole in the piece into which the screw goes small enough for the thread of the screw to catch tight. Then all the strength exerted in driving, goes toward drawing the pieces together, not in overcoming friction. The hole must be deep enough, especially in hard wood and for brass screws, to prevent the possibility of twisting off and breaking the screw. Soap is often useful as a lubricant to facilitate the driving of screws. Where it is desirable that the heads do not show, a hole may first be bored with an auger-bit large enough to receive the head and deep enough to insert a plug of wood, which is cut out with a plug-cutter, Fig. 131, and glued in place. If pains are taken to match the grain, the scar thus formed is inconspicuous.
In rough work, the screw may be driven into place with a hammer thru most of its length, and then a few final turns be given with a screwdriver, but this breaks the fibers of the wood and weakens their hold. In “drive-screws,” Fig. 229, e, the slot is not cut all the way across the head, in order that the blows of the hammer may not close the slot.
The advantages of screws are, that they are very strong and that the work can easily be taken apart. If they loosen they can be re-tightened. The disadvantages are, that they are expensive, that they take time to insert, that they show very plainly, and that they do not hold well in end grain.
BOLTS
Bolts with nuts are useful where great strength is desired. There are three chief varieties, Fig. 230.

| Fig. 230. |
| a. Stove-bolt. |
| b. Carriage-bolt. |
| c. Machine-bolt. |
Stove-bolts are cheaply made (cast) bolts having either flat or round heads with a slot for the screwdriver, like ordinary screws.
Carriage-bolts are distinguished by having the part of the shank which is near the head, square.
Machine-bolts have square, hexagonal, or button heads.
Machine-screws, Fig. 231, are similar to stove-bolts, but are accurately cut and are measured with a screw-gage. The varieties are, a, flat-head, b, round-head, c, fillister-head, d, oval-countersunk-head, all with slots for screwdriver.
| Fig. 231. Machine-screws. |
| a. Flat-head. |
| b. Round-head. |
| c. Fillister-head. |
| d. Oval-countersunk-head. |
Plates, Fig. 232, include corner-irons, straight plates and panel-irons. These are made of either iron or brass and are used in fastening legs to the floor, in stiffening joints, affixing tops, etc.
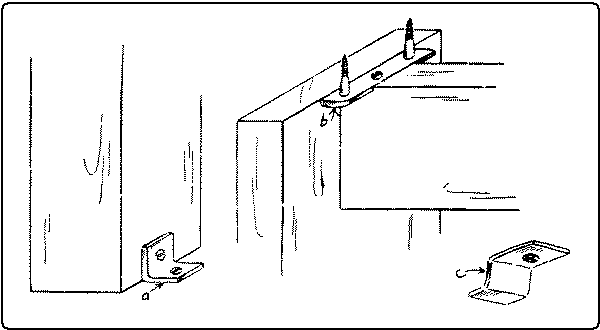
| Fig. 232. |
| a. Corner-iron. |
| b. Straight plate. |
| c. Panel-iron. |
Dowel-rods. Dowel-rods are cylindrical rods, from 3⁄16” to 1″ in diameter, and 36″, 42″, and 48″ long. They are commonly made of birch or maple, but maple is more satisfactory as it shrinks less and is stronger than birch.
Dowels are used as pins for joining boards edge to edge, and as a substitute for mortise-and-tenon joints.
There is, to be sure, a prejudice against dowels on the part of cabinet-makers due, possibly, to the willingness to have it appear that doweling is a device of inferior mechanics. But doweling is cheaper and quicker than tenoning, and there are many places in wood construction where it is just as satisfactory and, if properly done, just as strong. Certain parts of even the best furniture are so put together.
Shoe pegs serve well as small dowels. They are dipped in glue and driven into brad-awl holes.
Wedges are commonly used in door construction between the edges of tenons and the insides of mortises which are slightly beveled, Fig. 266. Or the end of a tenon may be split to receive the wedges, Fig. 266. The blind wedge is used in the fox-tail joint, Fig. 266.
GLUE
Glue is an inferior kind of gelatin, and is of two kinds,—animal glue and fish glue. Animal glue is made of bones and trimmings, cuttings and fleshings from hides and skins of animals. Sinews, feet, tails, snouts, ears, and horn pith are also largely used. Cattle, calves, goats, pigs, horses, and rabbits, all yield characteristic glues.
The best glue is made from hides of oxen, which are soaked in lime water until fatty or partly decayed matter is eaten out and only the glue is left. The product is cleaned, boiled down and dried.
The best and clearest bone glues are obtained by leaching the bones with dilute acid which dissolves out the lime salts and leaves the gelatinous matters. Such leached bone is sold as a glue stock, under the name of “osseine.” This material together with hides, sinews, etc., has the gelatin or glue extracted by boiling again and again, just as soup stock might be boiled several times. Each extraction is called a “run.” Sometimes as many as ten or fifteen runs are taken from the same kettle of stock, and each may be finished alone or mixed with other runs from other stock, resulting in a great variety of commercial glues.
Manufacturers use many tests for glue, such as the viscosity or running test, the odor, the presence of grease or of foam, rate of set, the melting-point, keeping properties, jelly strength (tested between the finger tips), water absorption (some glues absorb only once their weight, others ten or twelve times), and binding or adhesive tests. This latter varies so much with different materials that what may be good glue for one material is poor for another.
Putting all these things together, glues are classified from grade 10 to 160, 10 being the poorest. The higher standards from 60 and upwards are neutral hide glues, clear, clean, free from odor, foam, and grease. The lower standards are chiefly bone glues, used for sizing straw hats, etc. They are rigid as compared with the flexibility of hide glues. For wood joints the grade should be 70 or over. For leather, nothing less than 100 should be used, and special cements are better still.
The best glue is transparent, hard in the cake, free from spots, of an amber color, and has little or no smell. A good practical test for glue is to soak it in water till it swells and becomes jelly-like. The more it swells without dissolving the better the quality. Poor glue dissolves. Glue is sometimes bleached, becoming brownish white in color, but it is somewhat weakened thereby.
Fish glue is made from the scales and muscular tissue of fish. Isinglass is a sort of glue made from the viscera and air bladder of certain fish, as cod and sturgeon.
Liquid glue may be made either from animal or fish glue. The LePage liquid glue is made in Gloucester, Mass., one of the greatest fish markets in the country. Liquid glue is very convenient because always ready, but is not so strong as hot glue, and has an offensive odor. Liquid glues are also made by rendering ordinary glue non-gelatinizing, which can be done by several means; as, for instance, by the addition of oxalic, nitric, or hydrochloric acid to the glue solution.
To prepare hot glue, break it into small pieces, soak it in enough cold water to cover it well, until it is soft, say twelve hours, and heat in a glue-pot or double boiler, Fig. 243. The fresher the glue is, the better, as too many heatings weaken it. When used it should be thin enough to drip from the brush in a thin stream, so that it will fill the pores of the wood and so get a grip. Two surfaces to be glued together should be as close as possible, not separated by a mass of glue. It is essential that the glue be hot and the wood warm, so that the glue may remain as liquid as possible until the surfaces are forced together. Glue holds best on side grain. End grain can be made to stick only by sizing with thin glue to stop the pores. Pieces thus sized and dried can be glued in the ordinary way, but such joints are seldom good. Surfaces of hard wood that are to be glued should first be scratched with a scratch-plane, Fig. 111.
To make waterproof glue, add one part of potassium bichromate to fifty parts of glue. It will harden when exposed to the air and light and be an insoluble liquid.8
Footnote 8: For recipes for this and other glues, see Woodcraft, May ’07, p. 49.
General directions for gluing.9 Before applying glue to the parts to be fastened together, it is a good plan to assemble them temporarily without glue, to see that all the parts fit. When it is desirable that a certain part, as the panel, in panel construction, should not be glued in place, it is a wise precaution to apply wax, soap, or oil to its edges before insertion. Since hot glue sets quickly, it is necessary after the glue is applied to get the parts together as soon as possible. One must learn to work fast but to keep cool. To expedite matters, everything should be quite ready before the process is begun, clamps, protecting blocks of wood, paper to protect the blocks from sticking to the wood, braces to straighten angles, mallet, try-square, and all other appliances likely to be required.
Footnote 9: For special directions, for particular joints, see under the various joints, (Chap. VII.)
Whenever it is possible to break up the process into steps, each step can be taken with more deliberation. For example, in assembling framed pieces that are doweled, it is well to glue the dowels into one set of holes beforehand, making tenons of them, as it were. Time is thus saved for the final assembling when haste is imperative. The superfluous glue around the dowels should be carefully wiped off.
Likewise in gluing up framed pieces, sections may be put together separately: as, the ends of a table, and when they are dry then the whole may be assembled. When the pieces are together the joints should be tested to see that they are true, and that there are no twists.
A good way to insure squareness, is to insert a diagonal brace on the inside, corner to corner, as in Fig. 294, p. 196. Such a brace should be provided when the trial assembly is made. Another good way to insure squareness is to pass a rope around two diagonally opposite posts, and then by twisting the rope, to draw these corners toward each other until the frame is square.
The superfluous glue may be wiped off at once with a warm damp cloth, but not with enough water to wet the wood. Or by waiting a few minutes until the glue thickens, much of it can readily be peeled off with an edge tool. Either of these ways makes the cleaning easier than to let the superfluous glue harden.
The work when glued should remain at least six hours in the clamps to harden.
HINGES
Hinges, Fig. 233, are made in several forms. The most common are the butt-hinge or butt, the two leaves of which are rectangular, as in a door-hinge; the strap-hinge, the leaves of which are long and strap-shaped; the Tee-hinge, one leaf of which is a butt, and the other strap-shaped; the chest-hinge, one leaf of which is bent at a right angle, used for chest covers; the table-hinge used for folding table tops with a rule joint; the piano-hinge, as long as the joint; the blank hinge or screen-hinge which opens both ways; the stop-hinge, which opens only 90°; and the “hook-and-eye” or “gate” hinge.
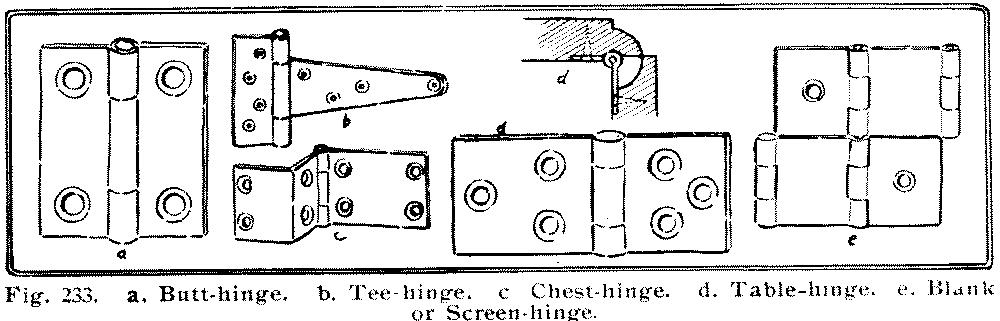
| Fig. 233. |
| a. Butt-hinge. |
| b. Tee-hinge. |
| c. Chest-hinge. |
| d. Table-hinge. |
| e. Blank or Screen-hinge. |
The knuckle of the hinge is the cylindrical part that connects the two leaves, Fig. 234. The “acorn” is the head of the “pintle” or pin that passes through the knuckle. Sizes of butts are indicated in inches for length, and as “narrow,” “middle,” “broad” and “desk” for width. The pin may be either riveted into the knuckle as in box-hinges or removable as in door-butts. Sometimes, as in blind-hinges, the pintle is fastened into one knuckle, but turns freely in the other.

| Fig. 234. Parts of a butt-hinge. |
| 1.1. Leaves. |
| 2.2.2. Knuckle. |
| 3. Pintle. |
| 4. Acorn. |
A butt-hinge may be set in one of three positions, Fig. 235: (1) Where it is desired to have the hinge open as wide as possible, as in a door. Here the knuckle is set well out from the wood. (2) Where it is desired to have the hinged portion open flat and no more. Here the center of the pin is in line with the outside surface of the wood. This is less likely to rack the hinge than the other two positions. (3) Where it is desired to have the knuckle project as little as possible.
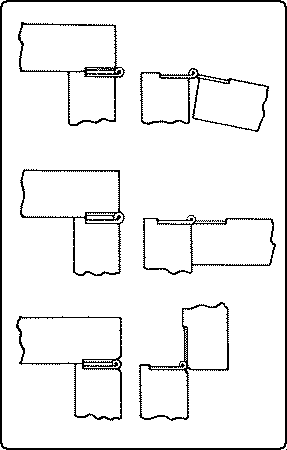
Fig. 235. Three Positions of Hinges.
HINGING
In setting the hinges of a box cover, first see that the cover fits the box exactly all the way around.
In the case of a door, see that it fits its frame, evenly all the way around, but with a little play. To insure a tighter fit at the swinging edge this edge should be slightly beveled inwards.
In attaching a butt-hinge, the essential thing is to sink the hinge into the wood, exactly the thickness of the knuckle. The gains may be cut in one or both of the pieces to be hinged together.
With these matters determined proceed as follows: In the case of a box cover, the hinges should be set about as far from the ends of the box as the hinge is long.
In the case of an upright door, locate the hinges respectively above and below the lower and upper rails of the door. Mark with the knife on the edge of the door the length of the hinge, and square across approximately the width of the gain to receive it. Do this for both hinges. Between these lines gage the proper width of the gains. Set another gage to one half the thickness of the knuckle and gage on the door face the depth of the gains. Chisel out the gains, set the hinges in place, bore the holes, and drive the screws. Place the door in position again to test the fit. If all is well, mark the position of the hinges on the frame, gage and cut the gains, and fasten in the hinges. Where the hinge is gained its full thickness into the door, no gain, of course, is cut in the frame. If the hinges are set too shallow, it is an easy matter to unscrew one leaf of each and cut a little deeper. If they are set too deep the screws may be loosened and a piece of paper or a shaving inserted underneath along the outer arris of the gain.
LOCKS
The chief parts of a lock are: the bolt, its essential feature, the selvage, the plate which appears at the edge of the door or drawer, the box, which contains the mechanism including the tumbler, ward, spring, etc., the key-pin, into or around which the key is inserted, the strike, the plate attached opposite the selvage, (often left out as in drawer-locks, but essential in hook-bolt locks, and self-locking locks,) and the escutcheon, the plate around the keyhole.
Locks may be classified: (1) According to their uses, of which there are two types. (a), Fig. 236, For drawers, cupboards, tills, wardrobes, and doors. In these the bolt simply projects at right angles to the selvage into the strike, and resists pressure sidewise of the lock. (b), Fig. 237, For desks, roll-top desks, chests, boxes and sliding doors. In these, the bolt includes a hook device of some kind to resist pressure perpendicular to the selvage. In some locks, the hook or hooks project sidewise from the bolt, in others the bolt engages in hooks or eyes attached to the strike.
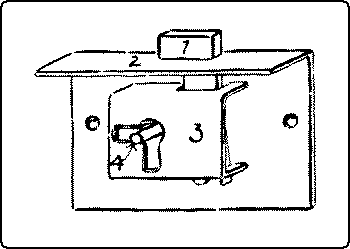
Fig. 236. Rim-lock, for Drawer.
1. Bolt. 2. Selvage.
3. Box. 4. Key-pin.
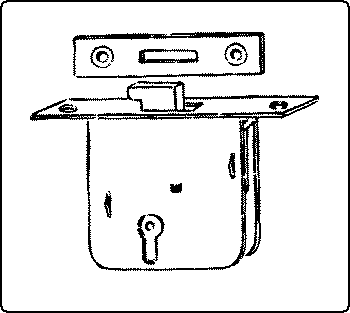
Fig. 237. Mortise-lock, for Box.
(2) According to the method of application, as rim locks, which are fastened on the surface, and mortise locks which are mortised into the edge of a door or drawer or box.
INSERTING LOCKS
To insert a rim-lock, measure the distance from the selvage to the key-pin, locate this as the center of the keyhole, and bore the hole. If the lock has a selvage, gain out the edge of the door or drawer to receive it. If the lock box has to be gained in, do that next, taking care that the bolt has room to slide. Cut the keyhole to the proper shape with a keyhole-saw or small chisel. Fasten the lock in place, and if there is a strike or face-plate, mark its place and mortise it in.
To insert a mortise-lock, locate and bore the keyhole, mortise in the box and the selvage, finish the keyhole, fasten in the lock, add the escutcheon, locate and mortise in the strike, and screw it in place.