The Humidity Diagram
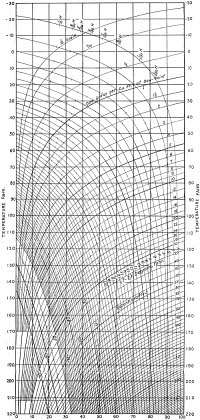
Fig. 93. The United States Forest Service Humidity Diagram for determination of Absolute Humidities. Dew Points and Vapor Pressures; also Relative Humidities by means of Wet and Dry-Bulb Thermometer, for any temperatures and change in temperature.
Some simple means of determining humidities and changes in humidity brought about by changes in temperature in the dry kiln without the use of tables is almost a necessity. To meet this requirement the United States Forestry Service has devised the Humidity Diagram shown in Figure 93. It differs in several respects from the hydrodeiks now in use.
The purpose of the humidity diagram is to enable the dry-kiln operator to determine quickly the humidity conditions and vapor pressure, as well as the changes which take place with changes of temperature. The diagram above is adapted to the direct solution of problems of this character without recourse to tables or mathematical calculations.
The humidity diagram consists of two distinct sets of curves on the same sheet. One set, the convex curves, is for the determination of relative humidity of wet-and-dry-bulb hygrometer or psychrometer; the other, the concave curves, is derived from the vapor pressures and shows the amount of moisture per cubic foot at relative humidities and temperatures when read at the dew-point. The latter curves, therefore, are independent of all variables affecting the wet-bulb readings. They are proportional to vapor pressures, not to density, and, therefore, may be followed from one temperature to another with correctness. The short dashes show the correction (increase or decrease) which is necessary in the relative humidity, read from the convex curves, with an increase or decrease from the normal barometric pressure of 30 inches, for which the curves have been plotted. This correction, except for very low temperatures, is so small that it may usually be disregarded.
The ordinates, or vertical distances, are relative humidity expressed in per cent of saturation, from 0 per cent at the bottom to 100 per cent at the top. The abscissae, or horizontal distances, are temperatures in degrees Fahrenheit from 30 degrees below zero, at the left, to 220 degrees above, at the right.
Examples of Use
The application of the humidity diagram can best be understood by sample problems. These problems also show the wide range of conditions to which the diagram will apply.
Example 1. To find the relative humidity by use of wet-and-dry-bulb hygrometer or psychrometer:
Place the instrument in a strong circulation of air, or wave it to and fro. Read the temperature of the dry bulb and the wet, and subtract. Find on the horizontal line the temperature shown by the dry-bulb thermometer. Follow the vertical line from this point till it intersects with the convex curve marked with the difference between the wet and dry readings. The horizontal line passing through this intersection will give the relative humidity.
Example: Dry bulb 70°, wet bulb 62°, difference 8°. Find 70° on the horizontal line of temperature. Follow up the vertical line from 70° until it intersects with the convex curve marked 8°. The horizontal line passing through this intersection shows the relative humidity to be 64 per cent.
Example 2. To find how much water per cubic foot is contained in the air:
Find the relative humidity as in example 1. Then the nearest concave curve gives the weight of water in grains per cubic foot when the air is cooled to the dew-point. Using the same quantities as in example 1, this will be slightly more than 5 grains.
Example 3. To find the amount of water required to saturate air at a given temperature:
Find on the top line (100 per cent humidity) the given temperature; the concave curve intersecting at or near this point gives the number of grains per cubic foot. (Interpolate, if great accuracy is desired.)
Example 4. To find the dew-point:
Obtain the relative humidity as in example 1. Then follow up parallel to the nearest concave curve until the top horizontal (indicating 100 per cent relative humidity) is reached. The temperature on this horizontal line at the point reached will be the dew-point.
Example: Dry bulb 70°, wet bulb 62°. On the vertical line for 70° find the intersection with the hygrometer (convex) curve for 8°. This will be found at nearly 64 per cent relative humidity. Then follow up parallel with the vapor pressure (concave) curve marked 5 grains to its intersection at the top of the chart with the 100 per cent humidity line. This gives the dew-point as 57°.
Example 5. To find the change in the relative humidity produced by a change in temperature:
Example: The air at 70° Fahr. is found to contain 64 per cent humidity; what will be its relative humidity if heated to 150° Fahr.? Starting from the intersection of the designated humidity and temperature coordinates, follow the vapor-pressure curve (concave) until it intersects the 150° temperature ordinate. The horizontal line then reads 6 per cent relative humidity. The same operation applies to reductions in temperature. In the above example what is the humidity at 60°? Following parallel to the same curve in the opposite direction until it intersects the 60° ordinate gives 90 per cent; at 57° it becomes 100 per cent, reaching the dew-point.
Example 6. To find the amount of condensation produced by lowering the temperature:
Example: At 150° the wet bulb reads 132°. How much water would be condensed if the temperature were lowered to 70°? The intersection of the hygrometer curve for 18° (150°-132°) with temperature line for 150° shows a relative humidity of 60 per cent. The vapor-pressure curve (concave) followed up to the 100 per cent relative humidity line shows 45 grains per cubic foot at the dew-point, which corresponds to a temperature of 130°. At 70° it is seen that the air can contain but 8 grains per cubic foot (saturation). Consequently, there will be condensed 45 minus 8, or 37 grains per cubic foot of space measured at the dew-point.
Example 7. To find the amount of water required to produce saturation by a given rise in temperature:
Example: Take the values given in example 5. The air at the dew-point contains slightly over 5 grains per cubic foot. At 150° it is capable of containing 73 grains per cubic foot. Consequently, 73-5=68 grains of water which can be evaporated per cubic foot of space at the dew-point when the temperature is raised to 150°. But the latent heat necessary to produce evaporation must be supplied in addition to the heat required to raise the air to 150°.
Example 8. To find the amount of water evaporated during a given change of temperature and humidity:
Example: At 70° suppose the humidity is found to be 64 per cent and at 150° it is found to be 60 per cent. How much water has been evaporated per cubic foot of space? At 70° temperature and 64 per cent humidity there are 5 grains of water present per cubic foot at the dew-point (example 2). At 150° and 60 per cent humidity there are 45 grains present. Therefore, 45-5=40 grains of water which have been evaporated per cubic foot of space, figuring all volumes at the dew-point.
Example 9. To correct readings of the hygrometer for changes in barometric pressure:
A change of pressure affects the reading of the wet bulb. The chart applies at a barometric pressure of 30 inches, and, except for great accuracy, no correction is generally necessary.
Find the relative humidity as usual. Then look for the nearest barometer line (indicated by dashes). At the end of each barometer line will be found a fraction which represents the proportion of the relative humidity already found, which must be added or subtracted for a change in barometric pressure. If the barometer reading is less than 30 inches, add; if greater than 30 inches, subtract. The figures given are for a change of 1 inch; for other changes use proportional amounts. Thus, for a change of 2 inches use twice the indicated ratio; for half an inch use half, and so on.
Example: Dry bulb 67°, wet bulb 51°, barometer 28 inches. The relative humidity is found, by the method given in example 1, to equal 30 per cent. The barometric line—gives a value of 3/100H for each inch of change. Since the barometer is 2 inches below 30, multiply 3/100H by 2, giving 6/100H. The correction will, therefore, be 6/100 of 30, which equals 1.8. Since the barometer is below 30, this is to be added, giving a corrected relative humidity of 31.8 per cent.
This has nothing to do with the vapor pressure (concave) curves, which are independent of barometric pressure, and consequently does not affect the solution of the previous problems.
Example 10. At what temperature must the condenser be maintained to produce a given humidity?
Example: Suppose the temperature in the drying room is to be kept at 150° Fahr., and a humidity of 80 per cent is desired. If the humidity is in excess of 80 per cent the air must be cooled to the dew-point corresponding to this condition (see example 4), which in this case is 141.5°.
Hence, if the condenser cools the air to this dew point the required condition is obtained when the air is again heated to the initial temperature.
Example 11. Determination of relative humidity by the dew-point:
The quantity of moisture present and relative humidity for any given temperature may be determined directly and accurately by finding the dew-point and applying the concave (vapor-pressure) curves. This does away with the necessity for the empirical convex curves and wet-and-dry-bulb readings. To find the dew-point some form of apparatus, consisting essentially of a thin glass vessel containing a thermometer and a volatile liquid, such as ether, may be used. The vessel is gradually cooled through the evaporation of the liquid, accelerated by forcing air through a tube until a haze or dimness, due to condensation from the surrounding air, first appears upon the brighter outer surface of the glass. The temperature at which the haze first appears is the dew-point. Several trials should be made for this temperature determination, using the average temperature at which the haze appears and disappears.
To determine the relative humidity of the surrounding air by means of the dew-point thus determined, find the concave curve intersecting the top horizontal (100 per cent relative humidity) line nearest the dew-point temperature. Follow parallel with this curve till it intersects the vertical line representing the temperature of the surrounding air. The horizontal line passing through this intersection will give the relative humidity.
Example: Temperature of surrounding air is 80; dew-point is 61; relative humidity is 53 per cent.
The dew-point determination is, however, not as convenient to make as the wet-and-dry-bulb hygrometer readings. Therefore, the hygrometer (convex) curves are ordinarily more useful in determining relative humidities.
The Hygrodeik
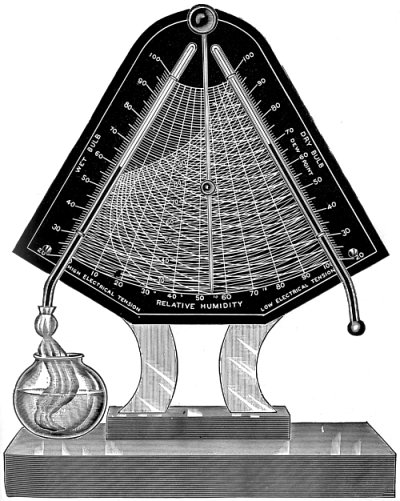
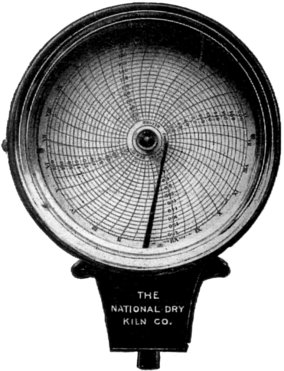
In Figure 94 will be seen the Hygrodeik. This instrument is used to determine the amount of moisture in the atmosphere. It is a very useful instrument, as the readings may be taken direct with accuracy.
To find the relative humidity in the atmosphere, swing the index hand to the left of the chart, and adjust the sliding pointer to that degree of the wet-bulb thermometer scale at which the mercury stands. Then swing the index hand to the right until the sliding pointer intersects the curved line, which extends downwards to the left from the degree of the dry-bulb thermometer scale, indicated by the top of the mercury column in the dry-bulb tube.
At that intersection, the index hand will point to the relative humidity on scale at bottom of chart (for example see Fig. 94). Should the temperature indicated by the wet-bulb thermometer be 60 degrees, and that of the dry-bulb 70 degrees, the index hand will indicate humidity 55 degrees, when the pointer rests on the intersecting line of 60 degrees and 80 degrees.
The Recording Hygrometer
In Figure 95 is shown the Recording Hygrometer complete with wet and dry bulbs, two connecting tubes and two recording pens and special moistening device for supplying water to the wet bulb.
This equipment is designed particularly for use in connection with dry rooms and dry kilns and is arranged so that the recording instrument and the water supply bottle may be installed outside of the dry kiln or drying room, while the wet and dry bulbs are both installed inside the room or kiln at the point where it is desired to measure the humidity. This instrument records on a weekly chart the humidity for each hour of the day, during the entire week.
The Registering Hygrometer
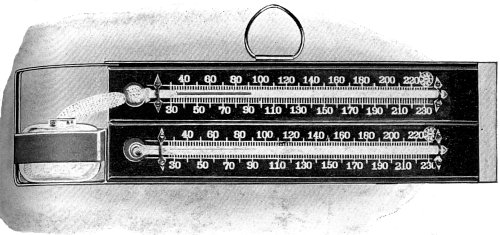
In Figure 96 is shown the Registering Hygrometer, which consists of two especially constructed thermometers. The special feature of the thermometers permits placing the instrument in the dry kiln without entering the drying room, through a small opening, where it is left for about 20 minutes.
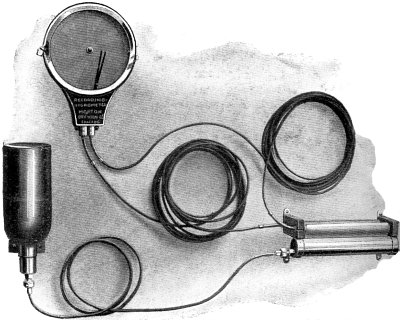
Fig. 95. The Recording Hygrometer, Complete with Wet and Dry Bulbs. This instrument records on a weekly chart the humidity for each hour of the day, during the entire week.
The temperature of both the dry and wet bulbs are automatically recorded, and the outside temperature will not affect the thermometers when removed from the kiln. From these recorded temperatures, as shown when the instrument is removed from the kiln, the humidity can be easily determined from a simple form of chart which is furnished free by the makers with each instrument.
The Recording Thermometer
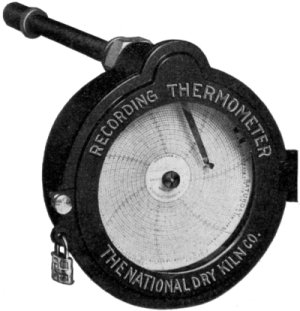
In Figure 97 is shown the Recording Thermometer for observing and recording the temperatures within a dry kiln, and thus obtaining a check upon its operation. This instrument is constructed to record automatically, upon a circular chart, the temperatures prevailing within the drying room at all times of the day and night, and serves not only as a means of keeping an accurate record of the operation of the dry kiln, but as a valuable check upon the attendant in charge of the drying process.
|
Fig. 98. The Registering Thermometer. |
The Registering Thermometer
In Figure 98 is shown the Registering Thermometer, which is a less expensive instrument than that shown in Figure 97, but by its use the maximum and minimum temperatures in the drying room during a given period can be determined.
The Recording Steam Gauge
In Figure 99 is shown the Recording Steam Pressure Gauge, which is used for accurately recording the steam pressures kept in the boilers. This instrument may be mounted near the boilers, or may be located at any distance necessary, giving a true and accurate record of the fluctuations of the steam pressure that may take place within the boilers, and is a check upon both the day and night boiler firemen.
The Troemroid Scalometer
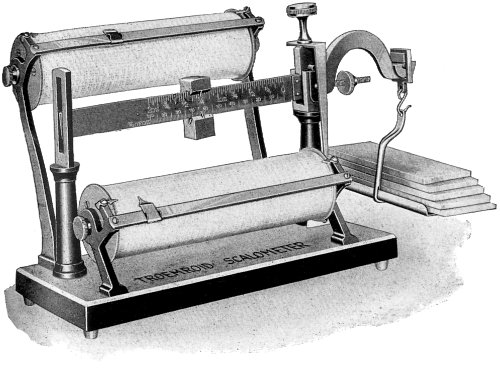
In Figure 100 is shown the Troemroid Scalometer. This instrument is a special scale of extreme accuracy, fitted with agate bearings with screw adjustment for balancing. The beam is graduated from 0 to 2 ounces, divided into 100 parts, each division representing 1-50th of an ounce; and by using the pointer attached to the beam weight, the 1-100th part of an ounce can be weighed.
The percentage table No. II has a range from one half of 1 per cent to 30 per cent and is designed for use where extremely fine results are needed, or where a very small amount of moisture is present. Table No. III ranges from 30 per cent up to 90 per cent. These instruments are in three models as described below.
Model A. (One cylinder) ranges from 1⁄2 of 1 per cent to 30 per cent and is to be used for testing moisture contents in kiln-dried and air-dried lumber.
Model B. (Two cylinders) ranges from 1⁄2 of 1 per cent up to 90 per cent and is to be used for testing the moisture contents of kiln-dried, air-dried, and green lumber.
Model C. (One cylinder) ranges from 30 per cent to 90 per cent and is applicable to green lumber only.
Test Samples.—The green boards and all other boards intended for testing should be selected from boards of fair average quality. If air-dried, select one about half way up the height of the pile of lumber. If kiln-dried, two thirds the height of the kiln car. Do not remove the kiln car from the kiln until after the test. Three of four test pieces should be cut from near the middle of the cross-wise section of the board, and 1⁄8 to 3⁄16 inch thick. Remove the superfluous sawdust and splinters. When the test pieces are placed on the scale pan, be sure their weight is less than two ounces and more than 13⁄4 ounces. If necessary, use two or more broken pieces. It is better if the test pieces can be cut off on a fine band saw.
Weighing.—Set the base of the scale on a level surface and accurately balance the scale beam. Put the test pieces on the scale pan and note their weight on the lower edge of the beam. Set the indicator point on the horizontal bar at a number corresponding to this weight, which may be found on the cylinder at the top of the table.
Dry the test pieces on the Electric Heater (Fig. 101) 30 to 40 minutes, or on the engine cylinder two or three hours. Weigh them at once and note the weight. Then turn the cylinder up and at the left of it under the small pointer find the number corresponding to this weight. The percentage of moisture lost is found directly under pointer on the horizontal bar first mentioned. The lower portion on the cylinder Table No. II is an extension of the upper portion, and is manipulated in the same manner except that the bottom line of figures is used for the first weight, and the right side of cylinder for second weight. Turn the cylinder down instead of up when using it.
Examples (Test Pieces)
Model A. Table No. II, Kiln-dried or Air-dried Lumber:
If first weight is 901⁄2 and the second weight is 87, the cylinder table will show the board from which the test pieces were taken had a moisture content of 3.8 per cent.
Model B. Tables No. II and III, Air-dried (also Green and Kiln-dried) Lumber.
If the first weight on lower cylinder is 97 and the second weight is 76, the table will show 21.6 per cent of moisture.
Model C. Table III, Green Lumber:
If the first weight is 94 and the second weight is 51, the table shows 45.8 per cent of moisture.
Keep Records of the Moisture Content
Saw Mills.—Should test and mark each pile of lumber when first piled in the yard, and later when sold it should be again tested and the two records given to the purchaser.
Factories.—Should test and mark the lumber when first received, and if piled in the yard to be kiln-dried later, it should be tested before going into the dry kiln, and again before being removed, and these records placed on file for future reference.
Kiln-dried lumber piled in storage rooms (without any heat) will absorb 7 to 9 per cent of moisture, and even when so stored should be tested for moisture before being manufactured into the finished product.
Never work lumber through the factory that has more than 5 or 6 per cent of moisture or less than 3 per cent.
Dry storage rooms should be provided with heating coils and properly ventilated.
Oak or any other species of wood that shows 25 or 30 per cent of moisture when going into the dry kiln, will take longer to dry than it would if it contained 15 to 20 per cent, therefore the importance of testing before putting into the kiln as well as when taking it out.
The Electric Heater
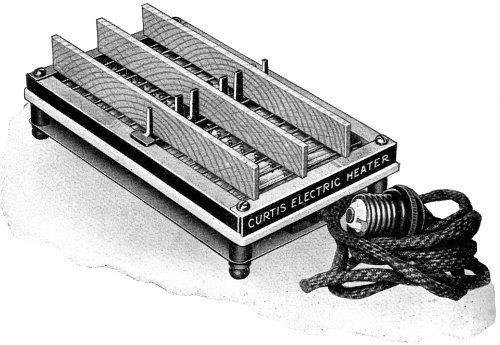
In Figure 101 is shown the Electric Heater. This heater is especially designed to dry quickly the test pieces for use in connection with the Scalometer (see Fig. 100) without charring them. It may be attached to any electric light socket of 110 volts direct or alternating current. A metal rack is provided to hold the test pieces vertically on edge.
Turn the test pieces over once or twice while drying.
It will require from 20 minutes to one hour to remove all the moisture from the test pieces when placed on this heater, depending on whether they are cut from green, air-dried, or kiln-dried boards.
Test pieces cut from softwoods will dry quicker than those cut from hardwoods.
When the test pieces fail to show any further loss in weight, they are then free from all moisture content.
INDEX: Seasoning of Wood
