I was at a Habitat for Humanity ReStore a few weeks back with my son. In a pile of saws I saw a 24″ long backsaw peaking out with a $5.00 price tag on it. I looked it over. Not a Disston, Warranted Superior. I explained to my son that we had a longer better old Disston at home, and that we didn’t need this saw. I put it back. Then on a different shelf, I saw a cruddy old miter station looking at me with a $12 pricetag on it. Now I was interested. I grabbed the saw, just because it was the mate to this miter station.
For a total of $17.00 I was pretty giddy about the whole thing.
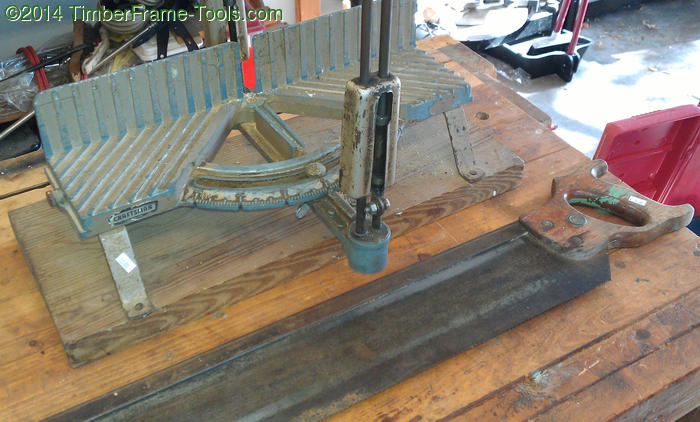
The saw I took only because I thought, what if my old Disston doesn’t fit? I’ll need a saw to use. The saw was pretty dirty, but not in too bad of shape. The miter station seemed to be operational and in pretty good condition. The rollers an guide rods were pretty gummed up with sawdust and oil but moved with a little help.

The guides were straight and only showed signs of a little rust (That is unusual down here in Florida)

All everything needed was just a little cleaning.

Notice how the oil from the guide rollers gave the saw two strips of protection from the rust.

I liked the design. The saw moved smoothly and the angles were easy to adjust.

The model number is stamped on the underside of the legs.
The model number 881 36301 gave me some hope of finding some information about this Craftsman miterbox.
Things just needed a little cleaning. I told myself I was not going to get carried away making this miter box and miter saw look like new. I was going to keep it simple. Then it started… well I just need to cover some little rust spots. I just need to de-grease the roller assembly… The next thing I knew I had removed all the old paint and painted the entire miter station.
Craftsman miter box restoration

New paint, and cleaned up.

The base is aluminum so it didn’t really need paint. But the next thing I know I am spring it with self-etching primer (needed for painting aluminum) and then giving it a nice gray color in gloss.

I carefully removed the label before painting, then stuck it back on with a little superglue after painting.

The guide rollers keep the saw on track and prevent the saw from striking the metal floor of the miterbox.
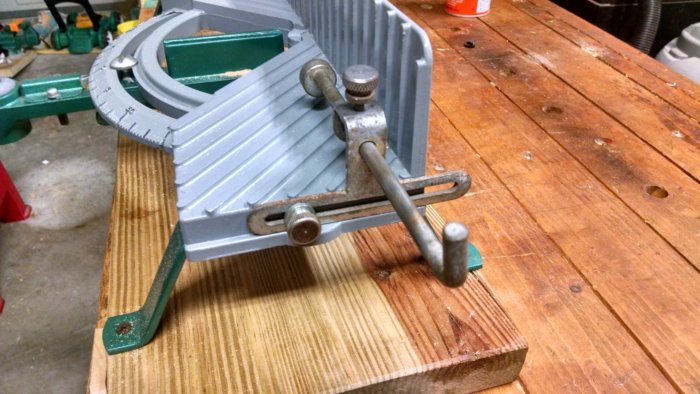
The four guide rollers front and back keep the saw aligned. By lossening a bolt and two top screws then turning the roller rod assembly, you can tighten the guide to the saw to remove as much play as possible. It seems to be a very solid system.

There are detents every 15 degrees, but any angle up to 45 on each side of normal is possible.

The two clips at the top of the guides allow you to lock the saw in the up position. It is not super secure, so don’t play too much with your hands beneath the teeth of the saw.

Here you can see the two adjustment screws. By loosening them and a bolt at the bottom of the assembly, you can adjust the rollers to the saw plate.
Most miter boxes or miter saw stations have a bench-hook that runs along the entire front of the miterbox. I wanted mine to be able to flip up so that the saw could sit flat on a bench without needing to be at the very edge of the bench. I also wanted to avoid having it be full length so that it would not rock if placed against a less than flat bench-front. So I added two quick flip down bench hooks to the front of the board that makes up the base of this miter saw station.
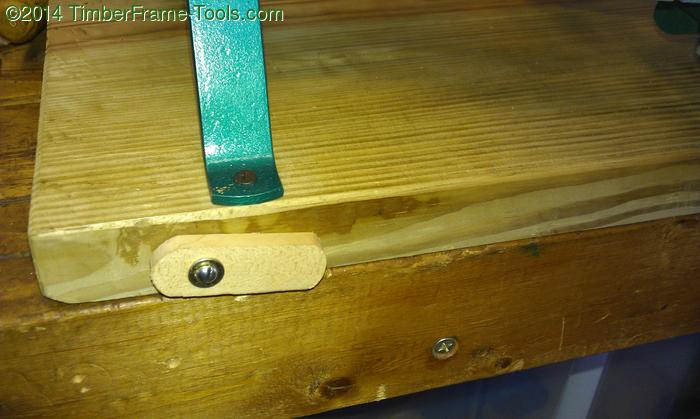
This miter station has 2 flip-down bench hooks

This saw is now too ugly for this miter box.
Craftsman 24″ miter saw restoration
Ok so now with the miter box all cleaned up and painted, it was time to give the saw some TLC.

The 24″ backsaw is no premium saw. The saw-nuts are steel and the medallion is “Warranted Superior?
Begin by putting a big piece of cardboard down over your bench to protect it from the saw grime slurry you are about to create. That and make sure your son is in disposable workshop clothes 😉

My son worked on the saw plate to the 24″ Craftsman backsaw while I worked on a 26″ Disston.
First came the WD-40 soak treatment, followed by some scraping to get rid of some of the rust scale and crud.

“This makes my hands buzzy dad.”
After a bunch of scraping, we decided to try the electric sander. My son had a ball with it (his first time with the sander), but the sandpaper just clogged too much with the crud from the saw. The electric sander only works well once all the crud is gone.
We also used a 2″ steel cup brush in the drill, a 4″ brass wheel in the drill and finally a flap sander. The metal brushes were nearly worthless, but the 60 grit flap wheel sander did a great job of removing the grime and the rust. I stuck a bit of blue painters tape over the region where the etch should be as a reminder to not sand that area.

This 60 grit flapwheel worked great at getting rid of crud and rust without clogging. Highly recommended.
Then there was some hand sanding with a solid sanding block and more WD-40 and lots of wiping of the rusty slurry. You go through a lot of paper towels.

Sand, wipe, spray, sand wipe spray…
Craftsman 24″ miter saw tote restoration
With the sawplate cleaned up, it is time to work on the saw tote.

I used a chisel to clean up some damage and do a little re-shaping.
I use this handscrew clamp in my end-vise to hold the saw-tote in a way that let me get to it the way I needed to.

Hold it how you want it, with a handscrew clamp.
Chisels, rasps, files and even a spokeshave were used to give this saw tote a more pleasant feel. I followed it up with some sanding and then some 0000 steel wool.
For finish, I started with a good rubdown of BLO and then when that was dry I followed up with several wipings of dewaxed shellac and mineral oil.

1/2″ chisel, a convex spokeshave, a halfround file, a tringular coarse file.
These before and after photos show the improvement in appearance and comfort. Flat sides and paint stains get replaced by slender curves and a smooth finish.

Before saw tote work

After saw tote work

This saw ended up having no etch (likely painted on lettering) and no stamp on the spine.
The finished team. All in working order, just in need of sharpening.

Complete and ready to sharpen.

Square and true.
My miterbox has one knurled bolt but is missing the pair of stops that came with it. The following photos are not mine and not of my miterbox but do document a nearly perfect version of the same miter box and clearly shows the missing stops.

Here is a rusty closeup of what I am missing. Though oddly this one is a photo of a Millers Falls miter box. Very similar design for their stops.

Same vintage make and model, and in it you can see the original paint job and the missing length stop.

Another of photo of the missing stop.

The pair of missing stops. and the original gold paint.
References
- I was able to find a manual that is for one iteration past the model 88136301 that I have. The model-88136301C-manual which has different methods for hanging the saw at the top of the rails, and the methods used to lock the miter arm into position.
- I found that Tom Fidgen at TheUnpluggedWorkshop.com has the same model miter box and roughly the same saw, though his has four saw-nuts to my three.
Update 9/8/2014
Sometimes the generosity of people overwhelms me. Lumberjock JMHJR found a matching stop in some old tools he acquired and sent it to me. Thank you JMHJR, she fits like she was meant to be there.
A missing stop, sent by a LumberJock.