A while back, a neighbor was cutting down an oak tree that was either a Southern Live Oak or a Swamp Laurel Oak. I tried to ID it using this oak tree guide but I no longer have access to leaves or acorns from that tree. They are pretty common, seem to grow fast and make good climbing trees for kids due to horizontally growing branches. I took a section that was a little under 4 feet long and about 14″ in diameter. I sawed it into a few slabs and set them aside to dry.

The two prime slabs are in need of drying for another year or so, but I decided to start playing with one of the more twisted flat-sawn outer sections. I normally like to stick to planing things by hand, so I planed for 15 minutes with a scrub plane and only making a weee flat area. This section is about 4 inches thick at the peak which means I’d need to plane off several inches of oak by hand. I started to re-think my method and was leaning toward making a router sled to flatten it and remove the bulk of the material.
Router sled requirements:
- Had to mount to my workbench.
- Adjustable height
- Easy to set up for bulk removal, but finely adjustable when needed.
- Easy to store (not take up too much room)
- Accommodate large width and height.
First the side rails
I decided to make the side rails out of 2″ x 12″ Southern Yellow Pine. The length would match my bench (48″…. yes I know it is a short bench).

To make the height adjustable I use 3/8″ bolts that I cut the threads off of. They slide into holes and then the bolt/pin sits on the top surface of my bench. I drilled holes at 1/2 intervals along a diagonal so I could adjust the height up to 8.5″ or down to 1″. I offset the holes by 3/16″ (half of 3/8″) from the top, so that when the pin is in the 1″ hole, the top of the 2″x12″ is really 1″ above the surface of my bench. The pins hold the height, while I clamp the sides to the bench. A pair of pipe clamps hold it together, but the pins hold the height. I didn’t want a clamp vibrating loose and letting the height shift.
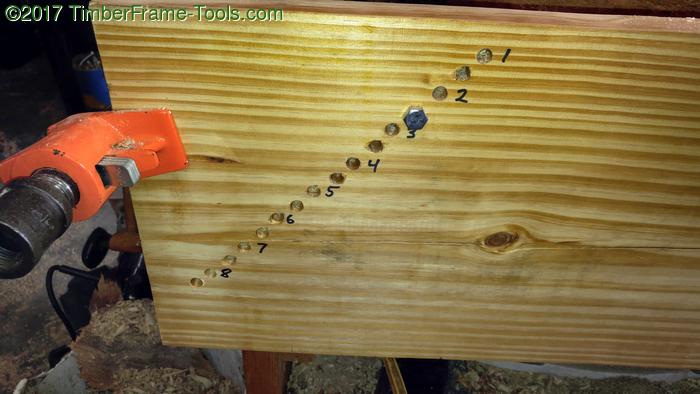
The bolt/peg sticks out about 4″ on the other side. Shims, if needed, under the bolt/pegs it make the entire system finely adjustable.
The router sled
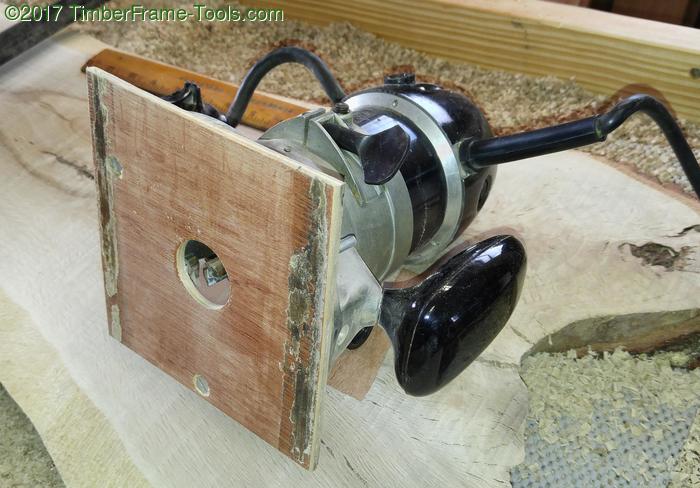
First I made a square base plate for one of my routers. It is just a piece of lauan plywood. I have this old Craftsman router that I keep expecting to die, but it doesn’t so I keep using it. 😉 I put a 1/2″ straight bit in it. As long as I kept the depth of the cut to less than 1/4″ it performed effortlessly. When I would push it beyond that, I had to spend more time fighting the cut. The black streaks on the baseplate are just paraffin wax from waxing the rails.
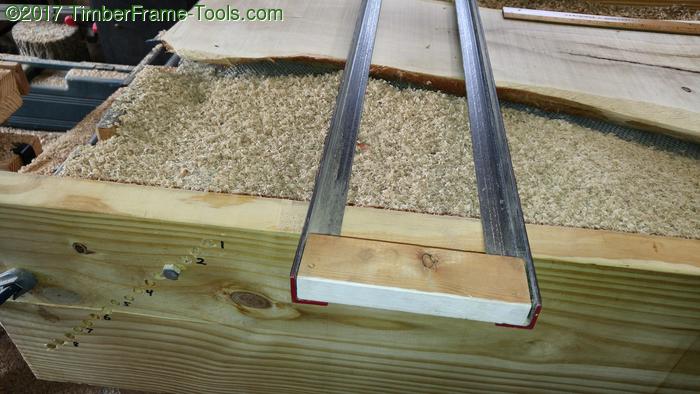
I first made a quick sled using some aluminum angle. It turned out it deflected a little too much, so I swapped it out for some angle-iron.

I made a pair of spacer blocks from 1″x2″ that were just an 1/8″ wider than the base plate on the router. I drilled some holes in the angle-iron at the far end, and screwed in the spacer. Then I used a secton of 2″x4″ with the ends cut at 45 degrees. I used a square to make sure the rails were square to the 2×4 section before screwing them down, then added the second spacer. When you are running the router, you lean against this block and it holds it tight to the 2″x12″.

To give it a little more holding power, I added a strip of 80 grit sandpaper to help keep the runner from sliding while I was leaning against it.
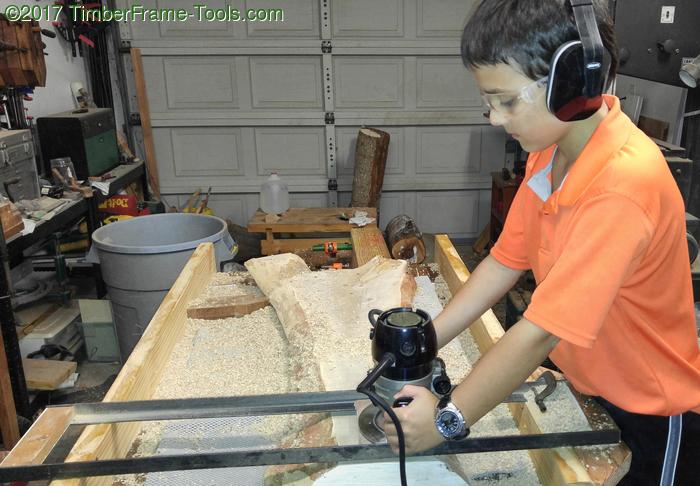
I applied some wax to the rails and then started flattening, one pass at a time.
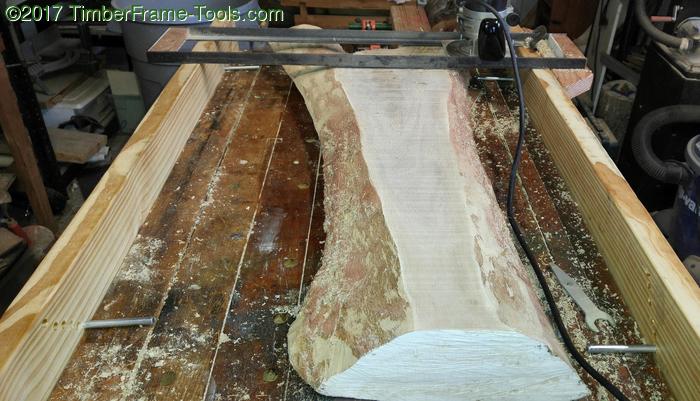
Overall it is a pretty smooth process. Even my son (8yr) felt comfortable running it once I set the depth.
I am very happy with how well this is working. It was simple build, simple to set up, adjust and take down. The angle-iron sled hangs on the wall when not in use, and the 2″x12″ sides stack and lay under the bottom of my workbench.
Tips for using a router sled
- Keep depth of cut less than 1/4″ per pass.
- Stop roughly every 20 passes and tighten the router collet. It only takes one time of the router bit slipping down deeper than you planned to spoil your work.
- Use an anti-slip pad and or some blocking to keep your slab from moving around.
- Paraffin wax rubbed on the angle-iron rails makes the sled slide pretty effortlessly.
- Don’t be so planar and linear. Yes this can imitate a thickness planer, but that is not all it can be. Consider what kind of fun you can have with one end being at 1″ above the bench height, and the other at 2.5″ above. Yep, a cool long taper on your wood slab … try that with a thickness planer 🙂
What a unique project. I’m building one as we have a sawmill and lots of slabs to flatten. Thanks for all the info to make building one easy