I have a Millers Fall No 77 Hand drill (eggbeater style) that was my Dad’s. I use it for small diameter drilling as it is not one of Miller’s Falls more powerful versions. It serves me well, but the handle on it is too small in diameter, and has always been a little wobbly. My drill was made some time between 1927 and 1931. The original handles had some curves to them and were stained hardwood. Mine appears to have a replacement made from what appears to be a black lacquered broom handle.
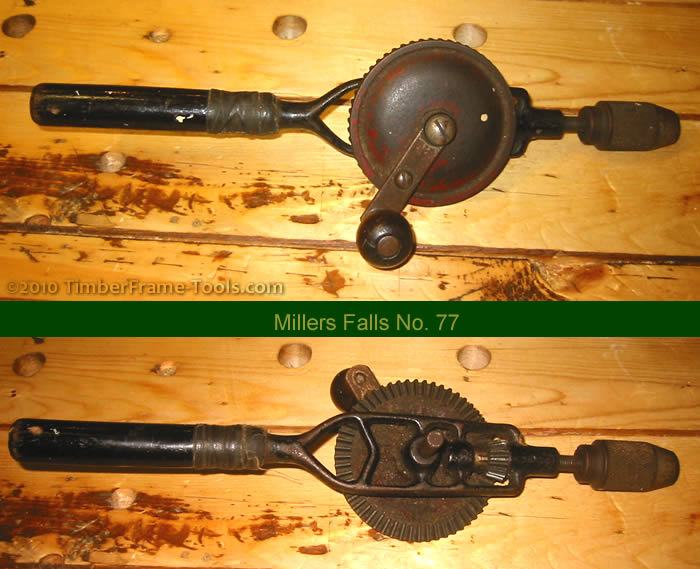
The handle has friction tape wrapped around the base which I suspect hides a crack. The tape is older than I am. The drill is also missing the side mushroom knob that is supposed to cover the shaft on the backside of the crank. As near as I can tell, that knob is functionally useless so I will not be building one for it. Most of the red paint is missing from the crank wheel. It is my intent just to make this drill more stable but not to restore it to its former beauty. I will not be painting the crank.
I peeled off the friction tape and discovered there was indeed a large crack in the handle and a finishing nail that acted as a pin to keep the handle from falling off. It seems someone did some clever modifications to keep that handle on. I disassembled the mechanical parts and put them in a dish and gave them a good soaking in WD-40.
After they soaked a while I started cleaning them up with more WD-40 and a toothbrush. I was able to get a lot of the crud off the gears. I used the edge of a razor blade to lift off some of the paint flecks.
A couple of the teeth on the gears were a bit malformed, as though they had been hit with a hammer. I used a triangular saw file to reshape them so they were not binding. Upon reassembly, everything ran pretty smoothly.
The back of the crank wheel had a lot of rough crud stuck to it. The WD-40 wasn’t touching it. I sprayed a little degreaser on it and let that penetrate while I scrubbed at it with the brush. The degreaser lifted the crud, but it also removed the underlying paint. [Mental note: don’t use that degreaser on valuable finishes]
The handle is my biggest concern. The drill will be easier to use with a larger and more stable handle.
 I had a maple branch that was roughly 3″ in diameter. Using my shaving horse and drawknife shaped it down to an inch and 3/4 and made it roughly round. I cleaned it up a little more with a Stanley 151 spokeshave. I probably should have used a lathe, but I don’t own one.
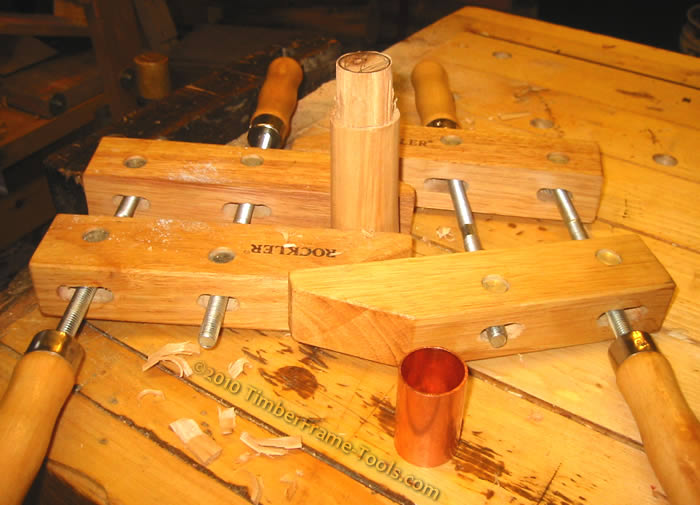
To avoid the new handle developing a similar crack as the one it is replacing, I am using a copper coupling to act as a ferrule. I am sure a thicker brass ferrule would be a better choice, but I don’t have any. I used a marking gauge to mark a ring all the way around the new handle that matched the length of the ferrule. I then used a saw to cut along that marked circumference cutting in to the approximate depth of the tenon that will go into the ferrule. I held the ferrule on the center of the end of the handle and used a pencil to mark the inside diameter of the ferrule. This will give me an idea or how much wood I have to remove to create the round tenon.
I secured the handle in one of my handscrew dogs, then secured a second handscrew dog to the first to keep it from rotating. I then used a chisel to carefully pare back the wood down to the saw kerf. Once I was quite close to the pencil circle, I put the ferule on the end, put a block of scrap wood on top, then pounded the ferrule into place.
Mistake: I should have rounded off the shoulders of the tenon before putting the copper ferrule in place. Using a file to round off the tenon afterward left some pretty deep scratches on the ferrule.
With the ends of the handle still flat, I put it in the vice in my drill press to drill the 7/16″ hole for the shank of the hand drill. Once the hole was drilled, I used a series of rasps and files to shape the end of the handle to a nice comfortable curve.
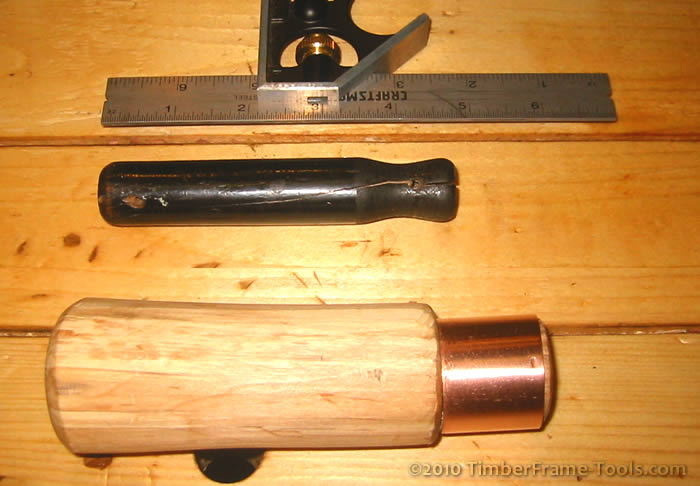
As you can see, the new handle is a bit longer, and has a much bigger diameter than the old handle
The handle I made is longer and larger in diameter than the one it is replacing. It is also larger in diameter than what would have been the factory original drill. I wanted the handle a bit more stout to give a better grip when drilling. I also left the slight facets from the spokeshave as I liked the way they felt on my hands and the better grip they afford. Here is a photo of what the Millers Falls No 77 looked like with a factory handle.
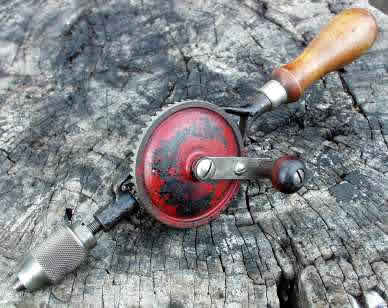
This is what the same drill looks like with a factory original handle and a bit more red paint.
With the new handle complete, it was just a matter of driving it onto the drill. The post on the drill measure just a whisker over 7/16″ and it has four little fins that help prevent it from spinning inside the hole. I believe friction will be tight enough to keep the drill securely in place in the handle so I am not planning at this time to make use of the hole in the shank. I don not know whether that was original or not.
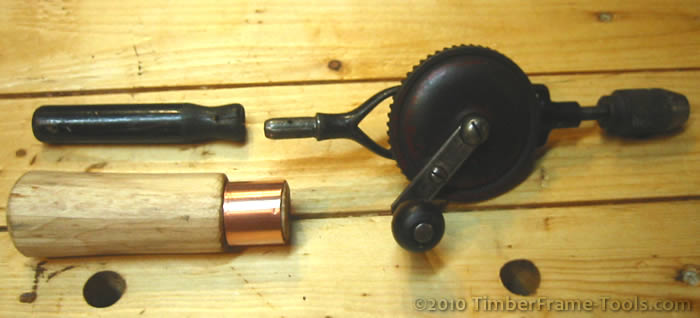
Here is the newly cleaned drill ready to be joined with the new handle.
Mistake: To drive the handle on, I placed the nose of the chuck into a dog hole on my workbench and used a mallet to drive the handle onto the drill. This was a bad idea for two reasons. 1) It damaged the wood around the dog hole. 2) It put a lot of stress on the thrust bearing that supports the shaft of the drill. No harm seems to have come to the thrust bearing, but that was fool’s luck. I could have damaged it, or broken the frame altogether.
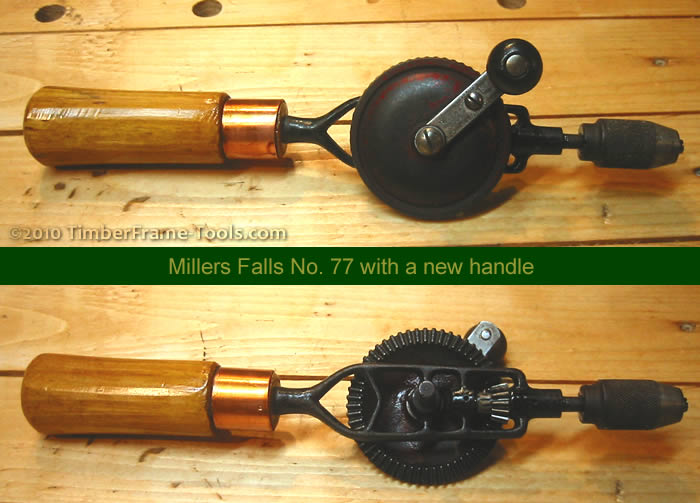
I finished the handle with three coats of amber shellac. After each coat, I rubbed the finish lightly with #0000 steel wool. I am happy with the way the drill looks and more importantly, I am much happier with how it performs. It is easy to drill any holes up to 1/4″ with the drill. I use it for much of my shop drilling unless I have more than 20 holes to drill, then I begrudgingly pick up the other cordless drill…the Makita with the battery.
Hand Drill Resources
- oldtoolheaven.com/hand_drills/drill.htm – This is a great source of Millers Falls Hand Drill information and history.
- www.georgesbasement.com/mfno135typestudy/ – This page is predominantly a study of Millers Falls No.1 Hand Drills, but it also contains much information about dating any old Millers Falls hand drill.
- Tuning an eggbeater uses a Millers Falls 77 as an example
- Millers Falls No. 77 Hand Drills currently for sale on eBay
- A great collection of articles on the history, features and restoration of the Millers Falls No.2 which is widely regarded as the best hand drill.
Hello, Great job on this. I actually have one of these, but it’s broken. I used it about 15 years ago and lost one of the 3 centralizers in the front chuck. Now, that “one” centralizer is all I need to put it back together. Don’t know where to find one either. Too bad for me. Your’s looks great. Awesome job. Congrats.
Wade
Hi Wade. I think chucks from any other Millers Falls drill will fit (at least as near as I can tell from the info on the Millers Falls history site). I’d create a search on ebay for “Millers Falls chuck” and have it email you whenever it finds a match. Or click on the RSS icon and add the search to your RSS reader if you use one. It may take a while, but I am sure one will surface. Good luck.
sometimes the whole chuck can be scavenged from another drill.
i’ve rebuilt these drills using parts from stanleys on miller falls, chinese copies on stanleys, etc.
That’s good to know Craig. It makes sense that some might use the same diameter and thread on the bolt.