No. 20. A notched joint is made by cutting out a portion of one timber. It is used where it is desired to reduce the height occupied by the upper timber. Joists are notched on to wall plates.
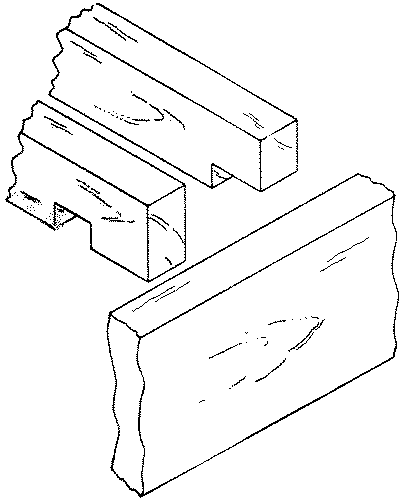
Fig. 265-20 Notched
No. 21. A checked joint or double notch is made by cutting out notches from both the timbers so as to engage each other. It is used where a single notch would weaken one member too much.
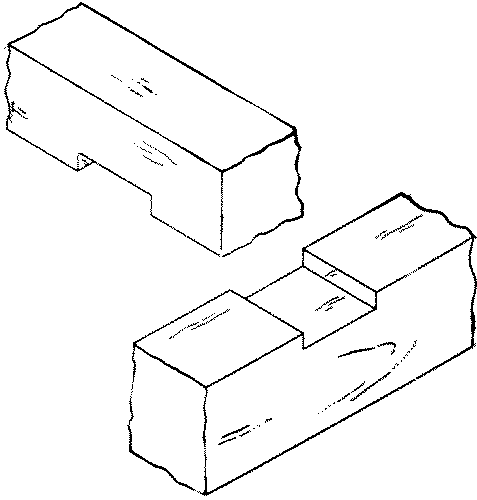
Fig. 265-21 Checked
No. 22. A cogged or corked or caulked joint is made by cutting out only parts of the notch on the lower piece, leaving a “cog” uncut. From the upper piece a notch is cut only wide enough to receive the cog. A cogged joint is stronger than a notched because the upper beam is not weakened at its point of support. It is used in heavy framing.
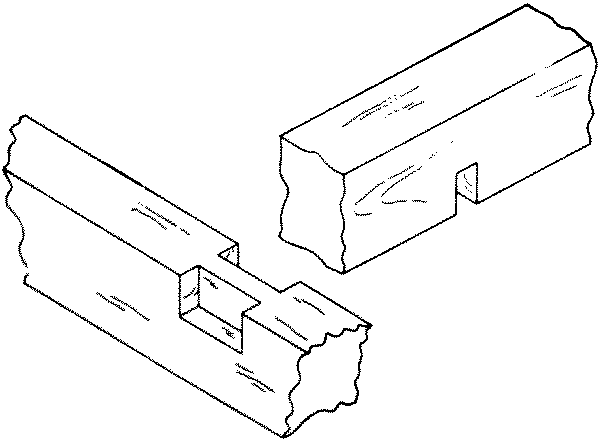
Fig. 265-22 Cogged
No. 23. A forked tenon joint is made by cutting a fork in the end of one member, and notching the other member to fit into the fork, so that neither piece can slip. It is used in knock-down furniture and in connecting a muntin to a rail, where it is desired that the muntin should run thru and also that the rail be continuous.
Fig. 265-23 Forked
No. 24. A rabbet or rebate or ledge joint is made by cutting out a portion of the side or end of a board or timber X to receive the end or side of another, Y. It may then be nailed from either the side or end or from both. The neatest way in small boxes is from the end, or better still it may be only glued.
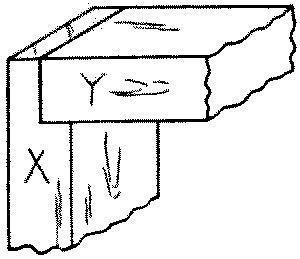
Fig. 266-24 Rabbet
No. 25. A dado or grooved joint is made by cutting in one member a groove into which the end or edge of the other member fits. Properly speaking a groove runs with the grain, a dado across it, so that the bottom of a drawer is inserted in a groove while the back of the drawer is inserted in a dado. Where the whole of the end of one member is let into the other, such a dado is also called a housed dado. Treads of stairs are housed into string boards.
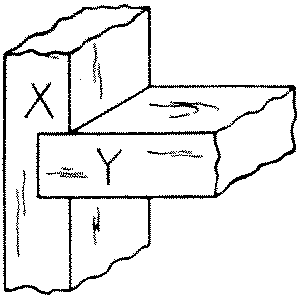
Fig. 266-25 Dado
To lay out a dado joint: After carefully dressing up both pieces to be joined, locate accurately with a knife point, on the member to be dadoed, called X, one side of the dado, and square across the piece with a try-square and knife. Then locate the other side of the dado by placing, if possible, the proper part of the other member, called Y, close to the line drawn. If this method of superposition is not possible, locate by measurement. Mark, with a knife point, on X, the thickness thus obtained. Square both these lines as far across the edges of X as Y is to be inserted. Gage to the required depth on both edges with the marking-gage.
To cut the joint: First make with the knife a triangular groove on the waste side of each line, as indicated in Fig. 91, and starting in the grooves thus made, saw with the back-saw to the gaged lines on both edges. The waste may now be taken out either with a chisel or with a router, Fig. 122. The second member, Y, should just fit into a dado thus made, but if the joint is too tight, the cheeks of the dado may be pared with a chisel. In delicate work it is often wise not to saw at all, but to use only the knife and chisel.
No. 26. A dado and rabbet is made by cutting a dado in one member, X, and a rabbet on the other, Y, in such a way that the projecting parts of both members will fit tight in the returns of the other member. It is used in boxes and gives plenty of surface for gluing.
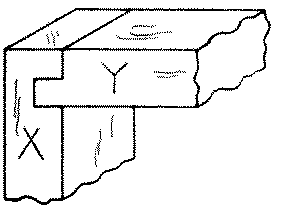
Fig. 266-26 Dado and rabbet
No. 27. A dado, tongue and rabbet is a compound joint, made by cutting a rabbet on one member, Y, and then a dado in this rabbet, into which fits a tongue of the other member, X. It is used in machine-made drawers.
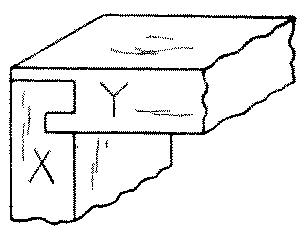
Fig. 266-27 Dado tongue and rabbet
No. 28. A dovetail dado or gain is made by cutting one or both of the sides of the infitting member, Y, on an angle so that it has to be slid into place and cannot be pulled out sidewise. It is used in book-cases and similar work, in which the shelves are fixed.
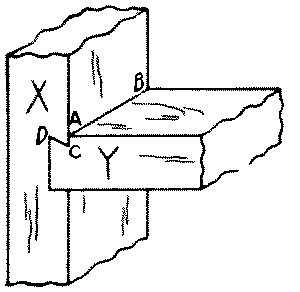
Fig. 266-28 Dovetail dado
To make this joint, first lay out the dovetail on the member to be inserted, called Y, thus: Across one end square a line (A B, No. 28), at the depth to which this member is to be dadoed in. Set the bevel-square at the proper angle for a dovetail, Fig. 250. Score this angle on the edges of the member, as at C D. Cut a groove with a knife on the waste side of A B. Saw to the depth A C, and chisel out the interior angle A C D.
Then lay out the other member, X, thus: mark with the knife the proper place for the flat side of Y, square this line across the face and on the edges as for a simple dado. Lay out the thickness of Y on the face of X by superposition or otherwise and square the face and edges, not with a knife but with a sharp pencil point. Gage the required depth on the edges. Now with the bevel-square as already set, lay out the angle A C D on the edges of X, and across the face at C score a line with knife and try-square. Cut out grooves in the waste for the saw as in a simple dado, and saw to the proper depth and at the proper angle. Chisel or rout out the waste and when complete, fit the pieces together.
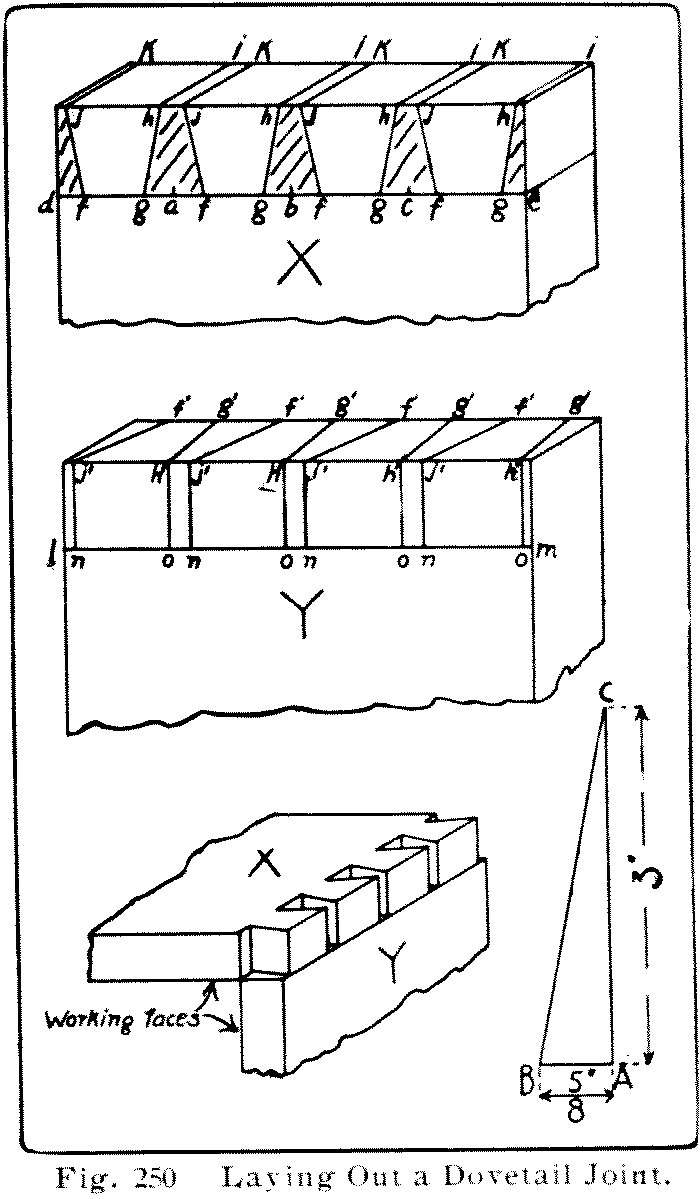
Fig. 250. Laying Out a Dovetail Joint.
No. 29. A gain joint is a dado which runs only partly across one member, X. In order to make the edges of both members flush and to conceal the blind end of the gain, the corner of the other member, Y, is correspondingly notched out. In book shelves a gain gives a better appearance than a dado.
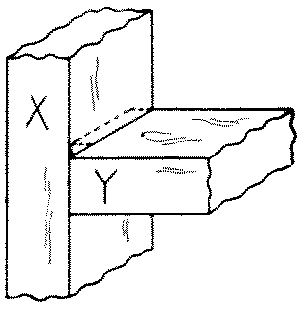
Fig. 266-29 Gain
A gain joint is laid out in the same way as the dado, except that the lines are not carried clear across the face of X, and only one edge is squared and gaged to the required depth. Knife grooves are made in the waste for starting the saw as in the dado. Before sawing, the blind end of the gain is to be chiseled out for a little space so as to give play for the back-saw in cutting down to the required depth. To avoid sawing too deep at the blind end, the sawing and chiseling out of waste may be carried on alternately, a little at a time, till the required depth is reached. It is easy to measure the depth of the cut by means of a small nail projecting the proper amount from a trial stick, Fig. 251. The use of the router, Fig. 122, facilitates the cutting, and insures an even depth.
Fig. 251. Depth-gage for Dado.
INDEX: Handwork in Wood