The most primitive as well as the simplest of all tools for the dividing of wood into parts, is the wedge. The wedge does not even cut the wood, but only crushes enough of it with its edge to allow its main body to split the wood apart. As soon as the split has begun, the edge of the wedge serves no further purpose, but the sides bear against the split surfaces of the wood. The split runs ahead of the wedge as it is driven along until the piece is divided.
It was by means of the wedge that primitive people obtained slabs of wood, and the great change from primitive to civilized methods in manipulating wood consists in the substitution of cutting for splitting, of edge tools for the wedge. The wedge follows the grain of the wood, but the edge tool can follow a line determined by the worker. The edge is a refinement and improvement upon the wedge and enables the worker to be somewhat independent of the natural grain of the wood.
In general, it may be said that the function of all cutting tools is to separate one portion of material from another along a definite path. All such tools act, first, by the keen edge dividing the material into two parts; second, by the wedge or the blade forcing these two portions apart. If a true continuous cut is to be made, both of these actions must occur together. The edge must be sharp enough to enter between the small particles of material, cutting without bruising them, and the blade of the tool must constantly force apart the two portions in order that the cutting action of the edge may continue.
The action of an ax in splitting wood is not a true cut, for only the second process is taking place, Fig. 59. The split which opens in front of the cutting edge anticipates its cutting and therefore the surfaces of the opening are rough and torn.
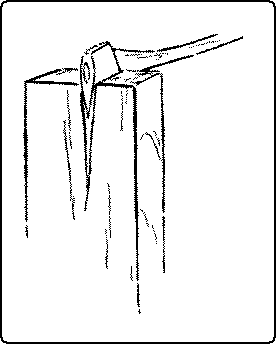
Fig. 59. Wedge Action.
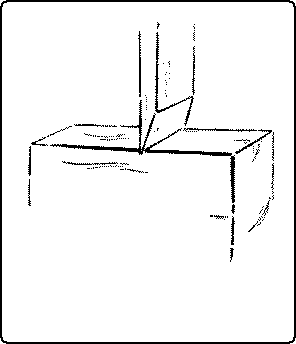
Fig. 60. Edge Action.
When a knife or chisel is pressed into a piece of wood at right angles to the grain, and at some distance from the end of the wood, as in Fig. 60, a continuous cutting action is prevented, because soon the blade cannot force apart the sides of the cut made by the advancing edge, and the knife is brought to rest. In this case, it is practically only the first action which has taken place.
Both the actions, the cutting and the splitting, must take place together to produce a true continuous cut. The edge must always be in contact with the solid material, and the blade must always be pushing aside the portions which have been cut. This can happen only when the material on one side of the blade is thin enough and weak enough to be readily bent out of the way without opening a split in front of the cutting edge. This cutting action may take place either along the grain, Fig. 61, or across it, Fig. 62.
The bending aside of the shaving will require less force the smaller the taper of the wedge. On the other hand, the wedge must be strong enough to sustain the bending resistance and also to support the cutting edge. In other words, the more acute the cutting edge, the easier the work, and hence the wedge is made as thin as is consistent with strength. This varies all the way from hollow ground razors to cold-chisels. For soft wood, the cutting angle (or bevel, or bezel) of chisels, gouges and plane-irons, is small, even as low as 20°; for hard wood, it must be greater. For metals, it varies from 54° for wrought iron to 66° for gun metal.
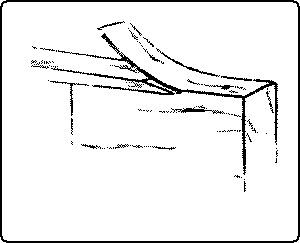
Fig. 61. Edge and Wedge Action With the Grain.
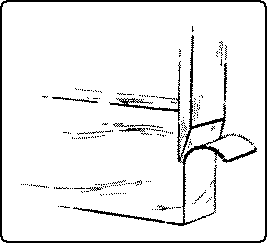
Fig. 62. Edge and Wedge Action Across the Grain.
Ordinarily a cutting tool should be so applied that the face nearest the material lies as nearly as possible in the direction of the cut desired, sufficient clearance being necessary to insure contact of the actual edge.
There are two methods of using edge tools: one, the chisel or straight cut, by direct pressure; the other, the knife or sliding cut.
The straight cut, Fig. 63, takes place when the tool is moved into the material at right angles to the cutting edge. Examples are: the action of metalworking tools and planing machines, rip-sawing, turning, planing (when the plane is held parallel to the edge of the board being planed), and chiseling, when the chisel is pushed directly in line with its length.
The knife or sliding cut, Fig. 64, takes place when the tool is moved forward obliquely to its cutting edge, either along or across the grain. It is well illustrated in cutting soft materials, such as bread, meat, rubber, cork, etc. It is an advantage in delicate chiseling and gouging. That this sliding action is easier than the straight pressure can easily be proved with a penknife on thin wood, or by planing with the plane held at an angle to, rather than in line with, the direction of the planing motion. The edge of the cutter then slides into the material. The reason why the sliding cut is easier, is partly because the angle of the bevel with the wood is reduced by holding the tool obliquely, and partly because even the sharpest cutting edge is notched with very fine teeth all along its edge so that in the sliding cut it acts like a saw. In an auger-bit, both methods of cutting take place at once. The scoring nib cuts with a sliding cut, while the cutting lip is thrust directly into the wood.
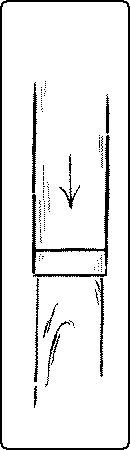
Fig. 63. Straight Cut.
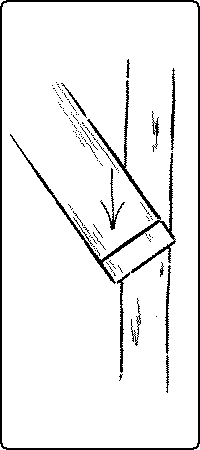
Fig. 64. Sliding Cut.
The chisel and the knife, one with the edge on the end, and the other with the edge on the side, are the original forms of all modern cutting tools.
The chisel was at first only a chipped stone, then it came to be a ground stone, later it was made of bronze, and still later of iron, and now it is made of steel. In its early form it is known by paleontologists as a celt, and at first had no handle, but later developed into the ax and adze for chopping and hewing, and the chisel for cuts made by driving and paring. It is quite likely that the celt itself was simply a development of the wedge.
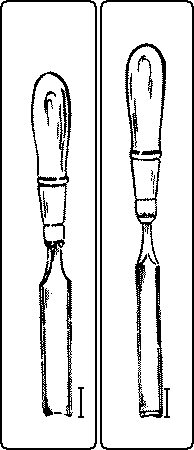
In the modern chisel, all the grinding is done on one side. This constitutes the essential feature of the chisel, namely, that the back of the blade is kept perfectly flat and the face is ground to a bevel. Blades vary in width from 1⁄16 inch to 2 inches. Next to the blade on the end of which is the cutting edge, is the shank, Fig. 65. Next, as in socketed chisels, there is the socket to receive the handle, or, in tanged chisels, a shoulder and four-sided tang which is driven into the handle, which is bound at its lower end by a ferrule. The handle is usually made of apple wood.
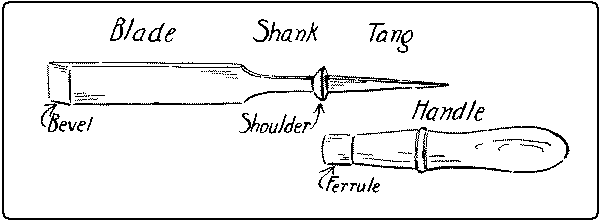
Fig. 65. Firmer-Chisel.
The most familiar form is the firmer-chisel, Fig. 65, which is said to get its name from the fact that it is firmer or stiffer than the paring-chisel. (See below.) The firmer-chisel is a general utility tool, being suited for hand pressure or mallet pounding, for paring or for light mortising.
Different varieties of chisels are named; (1) according to their uses; as paring-chisels, framing-chisels, mortise-chisels, carving-chisels, turning-chisels, etc.
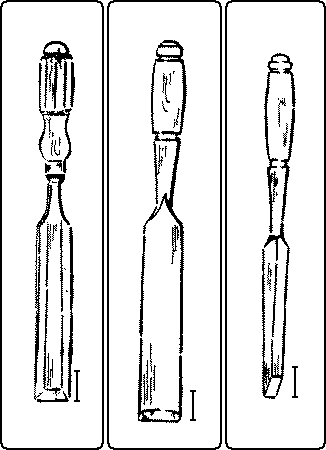
Fig. 66. Paring-Chisel. Fig. 67. Framing-Chisel. Fig. 68. Mortise-Chisel.
The paring-chisel, Fig. 66, has a handle specially shaped to give control over its movements, and a long thin blade, which in the best form is beveled on the two edges to facilitate grooving. It is intended only for steady pressure with the hand and not for use with a mallet.
The framing-chisel, Fig. 67, is thick and heavy and was formerly much used in house framing. It is usually made with the handle fitting into a socket on the shank, in order to withstand the shock of heavy blows from the mallet.
The mortise-chisel, Fig. 68, is made abnormally thick to give the stiffness necessary for levering the waste out of mortises.
(2) Chisels are also named according to their shapes: as, skew-chisels, corner-chisels, round-nosed chisels, etc.
The angle of the bevel of a chisel is determined by the kind of wood for which it is most used, hard wood requiring a wider angle than soft wood, in. For order to support the edge ordinary work, the bevel is correctly ground to an angle of about 20°. The chisel is a necessary tool in making almost every kind of joint. It may almost be said that one mark of a good workman is his preference for the chisel. Indeed an excellent motto for the woodworker is: “When in doubt, use a chisel”.
In general, there are two uses for the chisel (1), when it is driven by a push with the hand, as in paring, and (2), when it is driven by blows of a mallet, as in digging mortises.
In relation to the grain of the wood, it is used in three directions: (1) longitudinally, that is with the grain, called paring; (2) laterally, across the surface, called cutting sidewise; (3) transversely, that is across the end, called cutting end-wood.
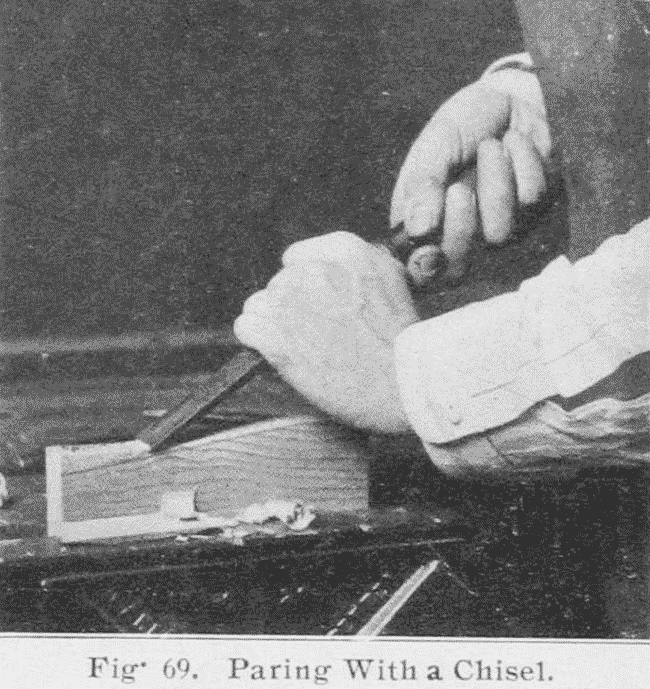
Fig. 69. Paring with a Chisel.
1. Paring. To remove shavings rapidly, the chisel is held flat side up, the handle grasped by the right hand, with the thumb pointing toward the shank, and the blade held in the left hand, as in Fig. 69. Held in this way great control can be exerted and much force applied. For paring the surface as flat and smooth as possible, the chisel should be reversed, that is, held so that the flat side will act as a guide. Held in this way the chisel has no equal for paring except the plane. Paring with the chisel is the method used in cutting stop chamfers. By holding the cutting edge obliquely to the direction of the grain and of the cut, the effective “sliding cut” is obtained, Fig. 64.
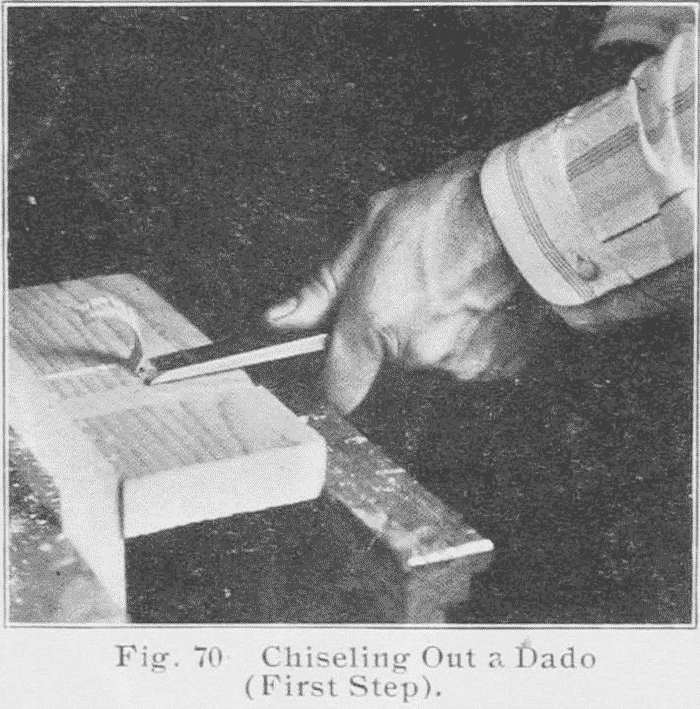
Fig. 70. Chiseling Out a Dado. (First Step).
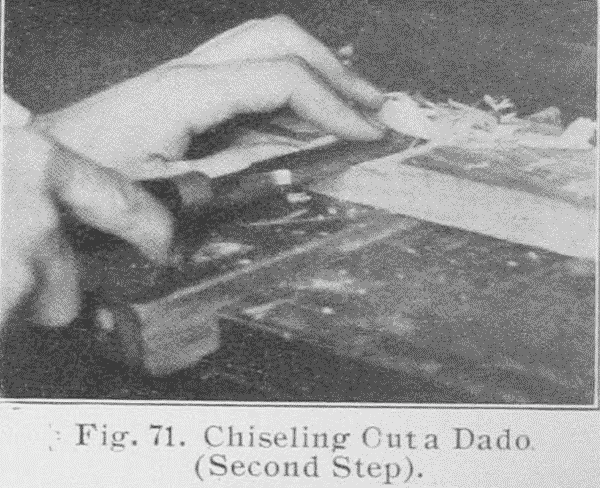
Fig. 71. Chiseling Out a Dado. (Second Step).
2. In sidewise chiseling the chisel is held in the same manner as in paring. A typical form of sidewise chiseling is the cutting out of a dado, Fig. 70. The work may be placed on the bench-hook or held in the vise with the side up from which the groove is to be cut. The chisel is pushed directly across the grain, the blade being somewhat inclined to the upper surface so as to cut off a corner next the saw kerf. After a few cuts thus made with the chisel inclined alternately both ways, the ridge thus formed is taken off, Fig. 71. In this way the surface is lowered to the required depth. If more force be required, the palm of the hand may be used as a mallet.
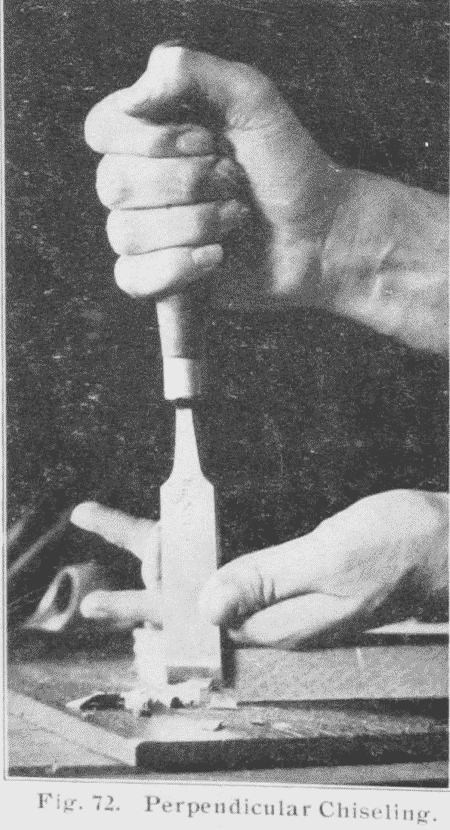
Fig. 72. Perpendicular Chiseling.
3. In chiseling end-wood, it is well, if possible, to rest the piece to be trimmed flat on the cutting board or on a piece of waste wood. Work done in this way is often called perpendicular chiseling, Fig.72. The handle is grasped in the right hand, thumb up, while the blade of the chisel passes between the thumb and first finger of the left hand, the back of which rests on the work and holds it in place. As the right hand pushes the chisel downwards the thumb and first finger of the left hand control its motion. When chiseling it is well to stand so as to look along the line being cut. Incline the chisel toward you, and use the near part of the cutting edge for a guide and the farther corner for cutting, pushing the handle both down and forward at the same time, Fig. 73. Or, by pushing the chisel sidewise with the thumb of the left hand at the same time that the right hand pushes it downward, the effective sliding cut is obtained.
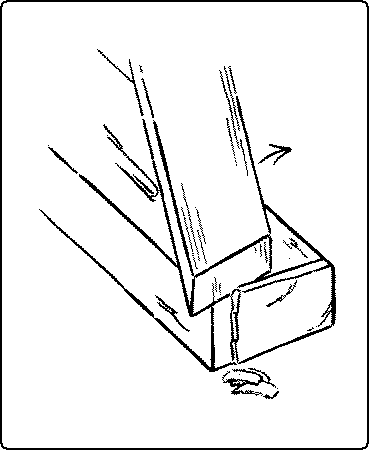
Fig. 73. Chiseling End Wood.
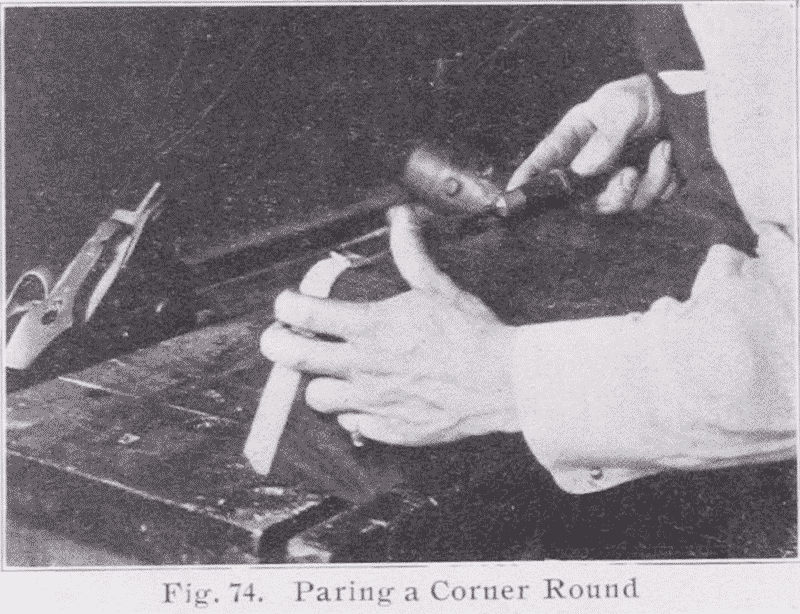
Fig. 74. Paring a Corner Round.
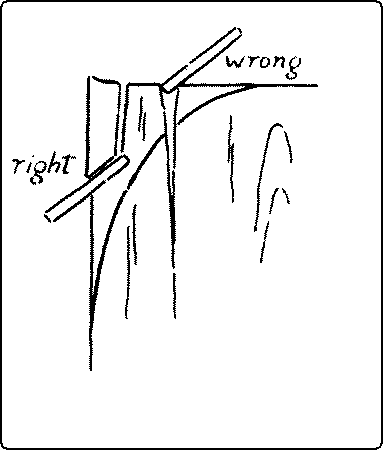
Fig. 75. Right and Wrong Ways of Perpendicular Chiseling.
End chiseling requires considerable force and therefore only thin shavings should be cut off at a time. Or the mallet may be used with caution. In order to leave a smooth surface the chisel must be very sharp. Even then the lower arris (corner) is likely to be splintered off. This can be prevented by clamping the work down tight with a handscrew to a perfectly smooth cutting board. It is often advisable however, to set the piece upright in the vise and pare off thin shavings horizontally, Fig. 74. In rounding a corner, both this and perpendicular chiseling are common methods. In both cases care should be taken to cut from the side toward the end and not into the grain, lest the piece split, Fig. 75. In horizontal end paring, Fig. 74, in order to prevent splintering, it is well to trim down the arrises diagonally to the line and then to reduce the rest of the end surface.
In all hand chiseling, it is a wise precaution not to try to cut out much material at each stroke but to work back gradually to the line.
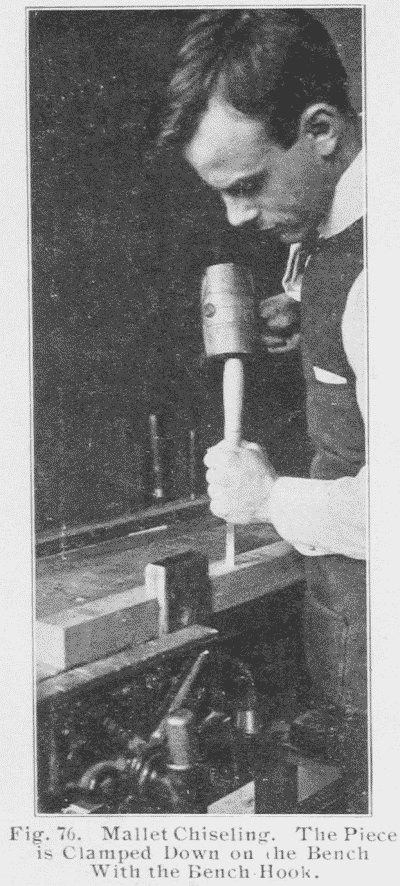
Fig. 76. Mallet Chiseling.
The Piece is Clamped Down on the Bench With the Bench Hook.
A typical form of mallet chiseling is the digging of a mortise, Fig. 76. (See also .) The chisel is held perpendicular in the left hand, while the right hand drives blows with the mallet. The hammer should never be used. (See mallet.) By rocking the chisel and at the same time giving it a twisting motion while the edge is kept on the wood, the edge can be stepped to the exact place desired. Care should be taken to work back to the lines gradually, to cut only part way thru from each side (in the case of a thru mortise-and-tenon), and to keep the cut faces perpendicular to the surfaces.
In sharpening a chisel it is of first importance that the back be kept perfectly flat. The bevel is first ground on the grindstone to an angle of about 20° and great care should be taken to keep the edge straight and at right angles to the sides of the blade.
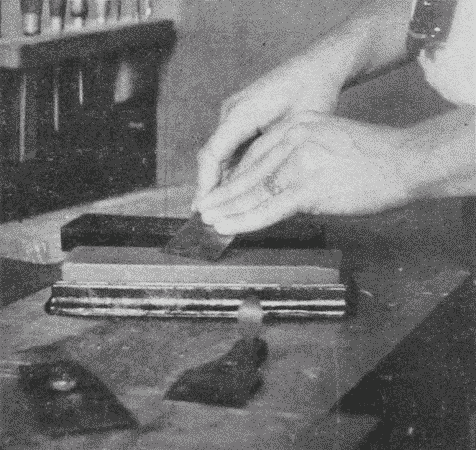
Fig. 77 Whetting a Plane-Bit.
After grinding it is necessary to whet the chisel and other edged tools. (See also under oilstones.) First see that there is plenty of oil on the stone. If an iron box be used, Fig. 77, the oil is obtained simply by turning the stone over, for it rests on a pad of felt which is kept wet with kerosene.
Place the beveled edge flat on the stone, feeling to see if it does lie flat, then tip up the chisel and rub it at an angle slightly more obtuse than that which it was ground, Fig. 78. The more nearly the chisel can be whetted at the angle at which it was ground the better. In rubbing, use as much of the stone as possible, so as to wear it down evenly. The motion may be back and forth or spiral, but in either case it should be steady and not rocking. This whetting turns a light wire edge over on the flat side. In order to remove this wire edge, the back of the chisel, that is, the straight, unbeveled side, is held perfectly flat on the whetstone and rubbed, then it is turned over and the bevel rubbed again on the stone. It is necessary to reverse the chisel in this way a number of times, in order to remove the wire edge, but the chisel should never be tipped so as to put any bevel at all on its flat side. Finally, the edge is touched up (stropped) by being drawn over a piece of leather a few times, first on one side, then on the other, still continuing to hold the chisel so as to keep the bevel perfect.
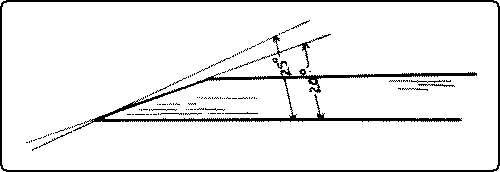
Fig. 78. Grinding Angle, 20°. Whetting Angle, 25°.
To test the sharpness of a whetted edge, draw the tip of the finger or thumb lightly along it, Fig. 79. If the edge be dull, it will feel smooth: if it be sharp, and if care be taken, it will score the skin a little, not enough to cut thru, but just enough to be felt.
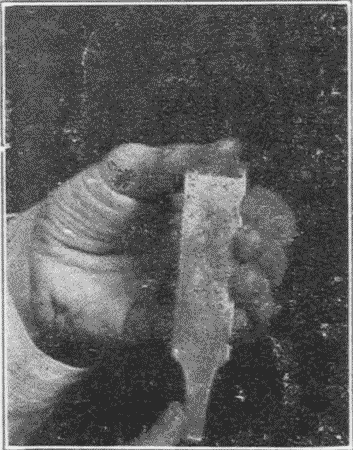
Fig. 79. Testing the Sharpness of a Chisel.
The gouge is a form of chisel, the blade of which is concave, and hence the edge curved. When the bevel is on the outside, the common form, it is called an outside bevel gouge or simply a “gouge,” Fig. 80; if the bevel is on the inside, it is called an inside bevel, or inside ground, or scribing-gouge, or paring-gouge, Fig. 81.3
Footnote 3: Another confusing nomenclature (Goss) gives the name “inside gouges” to those with the cutting edge on the inside, and “outside gouges” to those with the cutting edge on the outside.
| Fig. 80. Firmer-Gouge Outside Bevel. |
Fig. 81. Inside bevel Gouge. |
Carving tools are, properly speaking, all chisels, and are of different shapes for facility in carving.
For ordinary gouging, Fig. 82, the blade is gripped firmly by the left hand with the knuckles up, so that a strong control can be exerted over it. The gouge is manipulated in much the same way as the chisel, and like the chisel it is used longitudinally, laterally, and transversely.
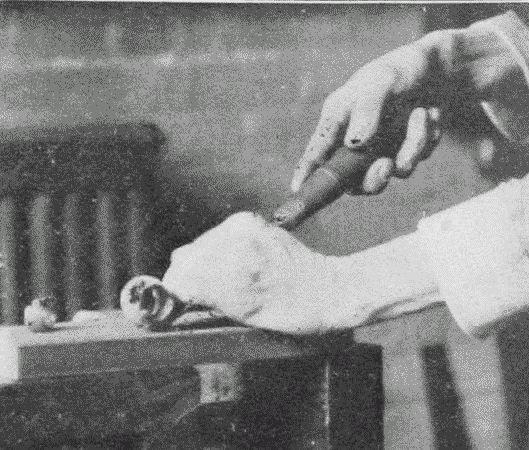
Fig. 82. Gouging.
In working with the grain, by twisting the blade on its axis as it moves forward, delicate paring cuts may be made. This is particularly necessary in working cross-grained wood, and is a good illustration of the advantage of the sliding cut.
In gouging out broad surfaces like trays or saddle seats it will be found of great advantage to work laterally, that is across the surface, especially in even grained woods as sweet gum. The tool is not so likely to slip off and run in as when working with the grain.
The gouge that is commonly used for cutting concave outlines on end grain, is the inside bevel gouge. Like the chisel in cutting convex outlines, it is pushed or driven perpendicularly thru the wood laid flat on a cutting board on the bench, as in perpendicular chiseling, Fig. 72.
In sharpening an outside bevel gouge, the main bevel is obtained on the grindstone, care being taken to keep the gouge rocking on its axis, so as to get an even curve. It is then whetted on the flat side of a slipstone, Fig. 83, the bevel already obtained on the grindstone being made slightly more obtuse at the edge. A good method is to rock the gouge on its axis with the left hand, while the slipstone held in the right hand is rubbed back and forth on the edge. Then the concave side is rubbed on the round edge of the slipstone, care being taken to avoid putting a bevel on it. Inside bevel gouges need to be ground on a carborundum or other revolving stone having a round edge. The outfit of the agacite grinder, (Fig. 224), contains one of these stones. The whetting, of course, is the reverse of that on the outside bevel gouge.

Fig. 83. Whetting a Gouge.
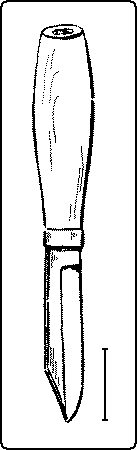
Fig. 84. Sloyd Knife.
The knife differs from the chisel in two respects, (1) the edge is along the side instead of the end, and (2) it has a two-beveled edge. Knives are sometimes made with one side flat for certain kinds of paring work, but these are uncommon. The two-beveled edge is an advantage to the worker in enabling him to cut into the wood at any angle, but it is a disadvantage in that it is incapable of making flat surfaces. The knife is particularly valuable in woodwork for scoring and for certain emergencies. The sloyd knife, Fig. 84, is a tool likely to be misused in the hands of small children, but when sharp and in strong hands, has many valuable uses. A convenient size has a 2½ inch blade. When grinding and whetting a knife, the fact that both sides are beveled alike should be kept in mind.
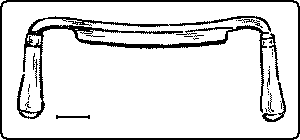
Fig. 85. Draw-Knife.
The draw-knife, Fig. 85, is ground like a chisel, with the bevel only on one side, but the edge is along the side like a knife. Instead of being pushed into the wood, like a chisel, it is drawn into it by the handles which project in advance of the cutting edge. The handles are sometimes made to fold over the edge, and thus protect it when not in use. The size is indicated by the length of the cutting edge. It is particularly useful in reducing narrow surfaces and in slicing off large pieces, but it is liable to split rather than cut the wood.
INDEX: Handwork in Wood