My taste in woodworking has not yet taken me down the road of turned pieces. I really have had no need of a lathe except for on rare occasion when I want to replace a handle on a chisel or some other tool. So far I have muddled through with working the pieces into shape on a shaving horse with a drawknife and spokeshave. Well today I am limited no more. I finally built the simple lathe that has been kicking around in my imagination for a while. It had to meet three requirements.
- No electricity
- Small footprint when not using it
- Inexpensive
- Functional
Rather than try to explain it as I construct it, I’ll present the finished piece first so you can see how it comes together.
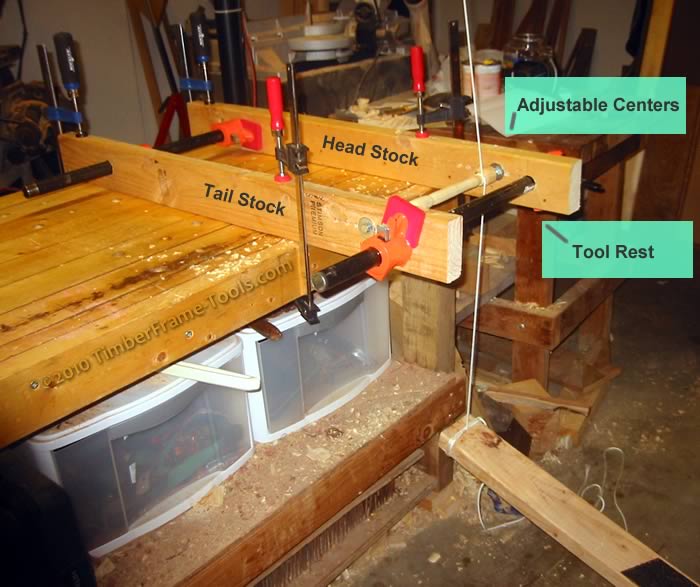
Fully equipped spring lathe with movable tail stock, adjustable centers and fixed tool rest.
The Bungee lathe is powered by me, and uses a bunji cord stretched across the ceiling to return the treadle and spin the wood backwards. It cost under $10 to make (assuming you already have pipe clamps, F-clamps and a solid workbench) takes only 2 minutes to set-up (once it is built) and hangs on a wall or stands in a corner when not being used (resembbles 3 ordinary scraps of 2×4 so I suggest marking them so they don’t accidentally get used for something else.
Bungee Lathe Design
This bungee lathe makes use of your workbench as the base for the lathe. If I intended to do a lot of turning I could have made a dedicated base for it, but for now the bench works well enough. The 2″x4″ arms that become the head and tail stock of the lathe get clamped to the workbench surface with 4 F-clamps. 2 get positioned at the back of the bench
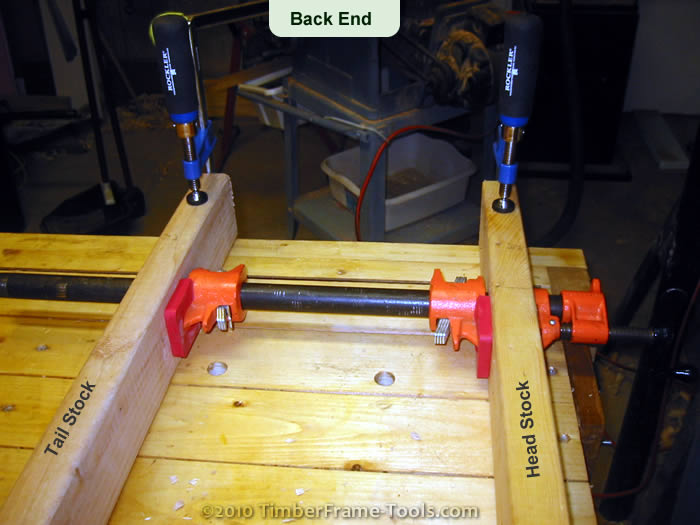
Here are the two F-clamps securing the head and tail stock to the bench. Notice that the pipe clamp is actually 1 and a half pipe clamp.
A 3/4″ pipe clamp acts as a stretcher to keep the rails a fixed width apart. The width is adjusted to be ~3″ wider than the length of the wood being turned. Notice that this requires a full pipe clamp set, plus the sliding tail piece off of another clamp. Not visible in the photo above is a 3/4″ piece of oak dowel glued into the bottom of the head stock so that it can be placed into a dog hole on the bench to fix its position in place. This is not required, but it does make it a little faster to set up the lathe.
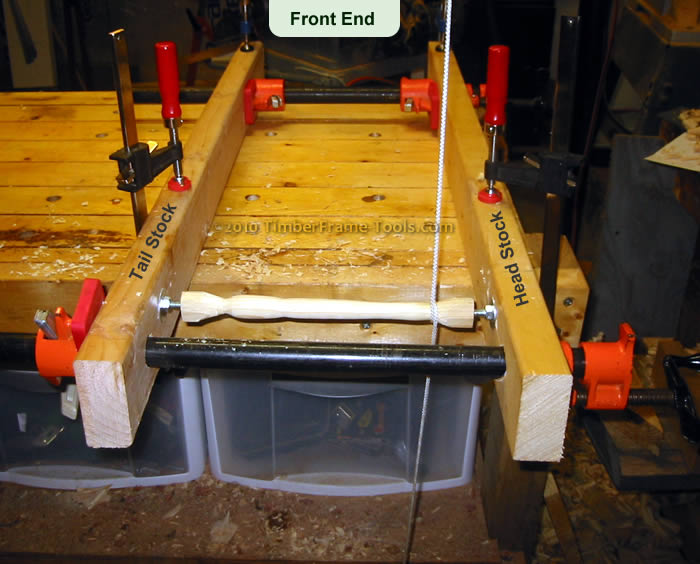
The front of the lathe uses another pair of F clamps to secure it, and a single pipe clamp to control both the clamping pressure on the work piece and acts as the tool rest.
The front end of this bungee lathe uses another 3/4″ pipe clamp to clamp the workpiece between the dead centers (the pivot points that the wood spins on). The pipe clamp also acts as a tool rest for the cutting tools. This differs from traditional lathe design where the tool rest is adjustable. In this case the location of the centers is adjustable. By moving them into any one of a series of holes, the workpiece can be moved toward or away from the tool rest.
Since the tool rest is fixed, I had to choose a height for it relative to the axis of turning and stick with it. After a bit of research I chose to make the tool rest 1/8″ above the axis of turning.
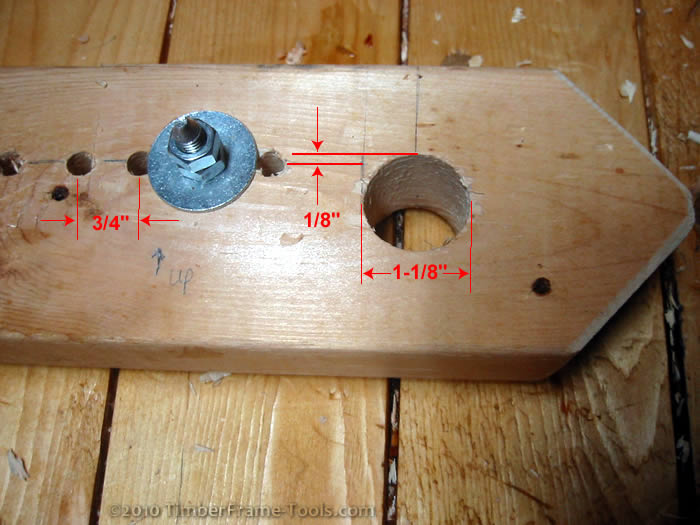
This photo shows the location of the tool rest hole, relative to the series of holes for the dead centers.
The hole for the pipe clamp is 1-1/8″ which is a little over-sized to allow the pipe clamp to be slid in or out with ease. The 5/16″ bolts that act as the dead centers (dead because they don’t spin) can be located in the series of holes shown. I spaced them 3/4″ apart mainly because I was worried that putting them closer together might lead to the center splitting the hole from one into the next. I think the 3/4″ spacing should allow enough adjustment, but time will tell. If I take to this and do a lot of turning, I may incorporate some kind of adjustable center on a T-track where the adjustment could be continuously variable. It is important that these holes are square to the surface of the wood so use a drill press if you can.
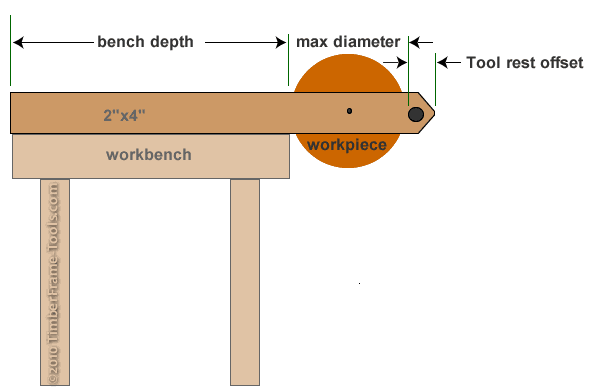
The sum of these three measurements will tell you how long you need to make your head and tail stock.
The length of the 2″x4″ used for the head and tail stock depends both upon the depth of your workbench and the diameter of the objects you want to turn. I chose to make mine 11″ longer than the depth of the bench. You lose about 4″ due to the pipe clamp / tool rest so the remaining depth of 7″ (11″-2″=7″) allows for space to turn an object with a diameter of just under 7″.
Making the Dead Centers
The dead centers are constructed from a pair of 5/16″ that were 3″ long. I developed a point on them by chucking them into a drill, creating a little angle stop block on my bench grinder, and spinning the bolt while holding the tip against the grinder. I then cut off the head of the bolt and put two nuts on and lock them together.
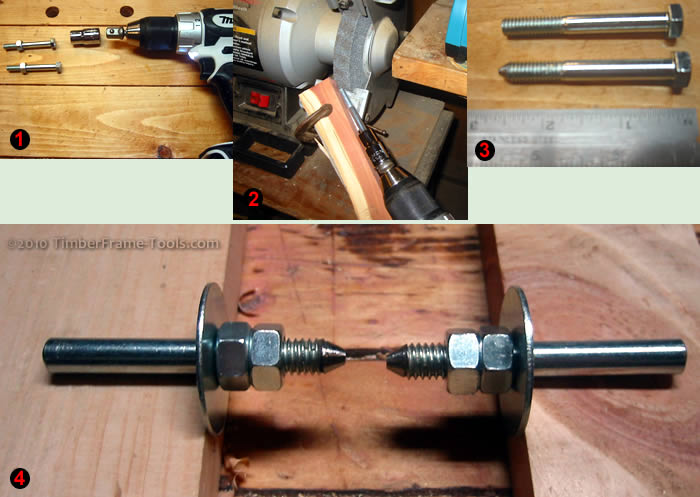
This series shows how a 5/16" bolt becomes a dead center on a bungee lathe.
I stopped short of bringing them to a perfect point because I was concerned that a point would be more likely to split the workpiece. It is my hope that the little flat on the tip will keep that from happening. It does mean however that to prep the workpiece I need to drill a shallow 1/8″ hole into the center of each end of the workpiece. In the event that this proves unreliable, I can always grind them to a full point later.
Treadle Powered
The lathe will have an energy exchange system where my leg will provide the energy, then the stretched bungee will reset the machine so my leg can provide some more …
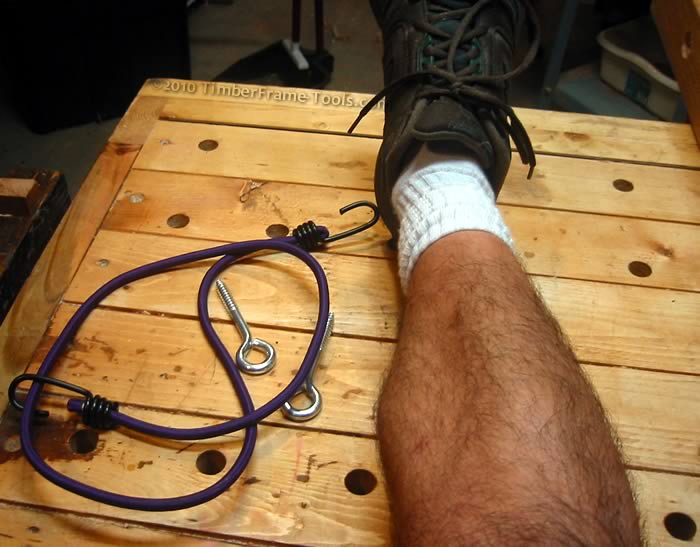
My leg and the bungee anchored with the screw eyes trade energy back and forth.
I purchased a 4′ bungee cord. The instructions on the package say it should not be stretched more than 50% of its original length, so that would be 6′ total. I chose to have it stretched 5′ at rest which would give me the extra foot of length when I push down on the treadle. I needed to space the screw-eyes 5 feet apart and wanted the mid-point to be directly above the right end of where the workpiece would go. I dropped a plumb-line down and found the spot directly above where I want the rope to wrap around the workpiece, I then measured off 2.5′ to each side of that mark and installed the screw-eyes. Notice I put them in above the baseline of the joist so as not to damage and weaken the crucial bottom of the joist.
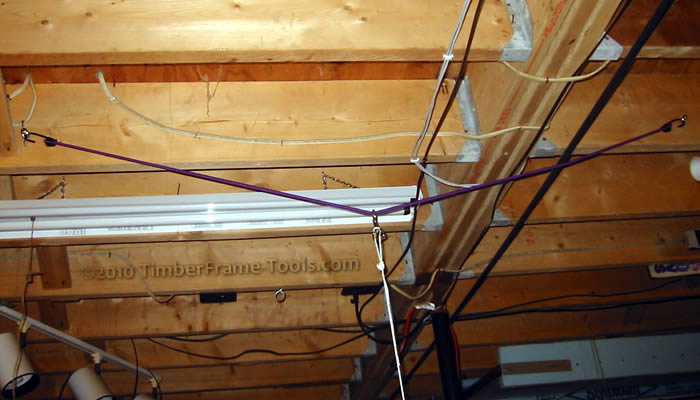
Here is the 4' bungee stretched to screw-eyes placed 5' apart. The drive cord connects to the bungee with a clasp so it is easy to remove and put back on.
I placed a snap-hook on the end of the drive or power cord to make it easier to attach or remove it from the bungee. The drive cord starts at the bungee, wraps down around the front of the workpiece and then connects to the treadle. I used 1/8″ nylon cord. It seems to work pretty well. It slips on occasion but only when I am digging in too deep with the gouge. In his book, Roy Underhill cautions that natural fiber cord frays more quickly. He says the best choice is round leather belting used on old machines. I have no idea where to find that, so I’ll stick with the nylon for now.
The treadle can be a simple section of board. I tried one about 2′ long and found that it moved around too much and my leg had to go up and down a lot with a treadle that short. After a bit of trial and error I was able find that a really good length was around 4′-5′. It gave a nice swing when worked with your foot. Unfortunately the end touching the ground still moved all over my smooth concrete floor. It made it hard to focus on the cutting (which I am brand new to) while the treadle wandered around on its own with my foot slipping off fairly often.
I glued a strip of coarse sandpaper to the board in the region where my foot would rest on the treadle. That kept my foot in place but the treadle still slid around. So I came up with a plan to cut a saddle notch in the end of the treadle and have that straddle the foot of my other workbench. I lucked out that the location of my two workbenches line up this way. Probably a piece of no-slip router mat under the end of the treadle would have worked just as well.
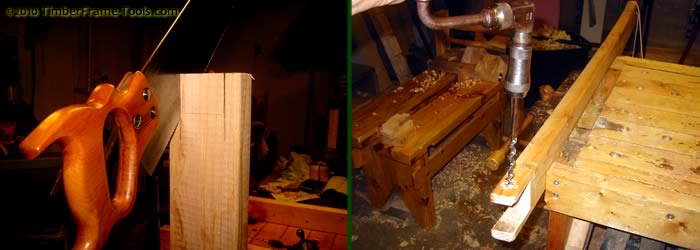
Cutting the saddle out and drilling (augering) a hole for a wooden cotter pin to keep it attached to the workbench foot.
I used an auger to bore a hole through the saddle legs so I could put a dowel retainer pin in to keep the saddle in place.
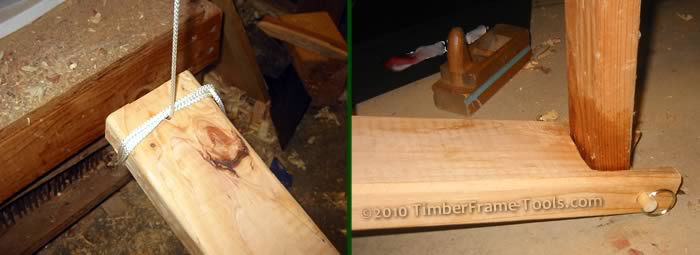
Here are the two important ends of the treadle. The cord end simply has the cord pass through the hole and then gets tied to the end. The floor end of the treadle straddles my other workbench foot. Notice the wax stain on the wood, used to keep the wood from squeaking.
With all of these pieces in place, I was ready to start turning.
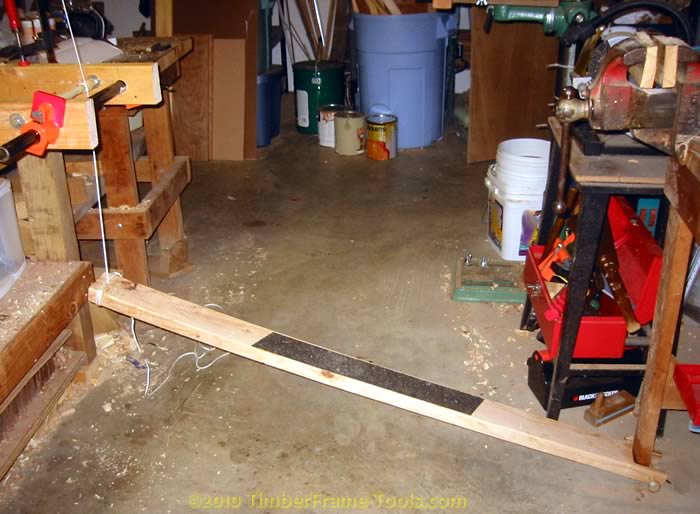
Here is the full bungee cord lathe ready to be used.
Turning Fun
Not only is this my first lathe, but this was also my first time using a lathe of any kind. Experienced turners look away now … you’ve been warned. I have not picked up any turning tools yet, so I tried my hand with an out canal gouge (err I mean out-cannel) and a 1/2″ Timber Framing mortising chisel. The wood I used was a piece of maple that I “roughed” out on the shaving horse with a drawknife. Looking at it, it didn’t look that out of round, but when spinning it on the lathe there was one section that moved in and out more than an inch. The results weren’t pretty.
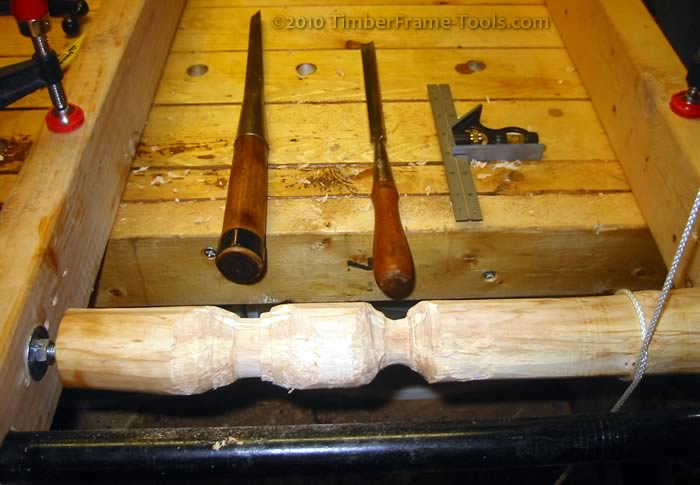
My first attempt: Turning an out of round piece of wood, with non-lathe tools.
So I eventually got two little stripes to round but the diameter of what was left was considerably smaller than what I started with. The other down side was that the really smooth surface originally left by the drawknife had been replaced by something that closely resembles the work done by beavers…. young inexperienced beavers. Aside from the wood chewing, I was also making a lot of noise with the lathe. My strokes on the treadle were too long and forceful as the treadle clacked onto the floor. I put an old t-shirt from my rag pile under the top end of the treadle … that didn’t help, still clacking, just now from the middle of the treadle instead of the end. This was not the quieter gentler woodworking I have been enjoying with my other doughnut powered tools. What have I done??
I continued on and slowly I realized that I worked smoother if I didn’t push my foot all the way to the floor but stopped just before I got there. I also noticed that it worked even more smoothly if I didn’t have my foot high up on the treadle. I started out almost as though I were climbing a step with the treadle. That delivered a lot of strength, but was awkward and clumsy. I moved my foot back so that my knee was almost bent to 90 degrees with my foot behind me and was just pressing up and down with my toes. This developed a really nice gentle and rapid rhythm that was easy to maintain. There was some hope for this after all.
So now that my treadling method had improved, I decided to try some different stock (it must be the wood’s fault 😉 ). Unfortunately I didn’t have much to work with. I had a 2″x2″ piece of pine so I quickly made it into an octagon with my scrub plane and mounted it in the lathe. That was spinning a lot better. I tried the gouge again …. hmm not much better results. Less chattering and clunking, but still not what I would call smooth. I remembered seeing Roy Underhill use a Skew chisel and say that the results are really smooth. I don’t have a skew chisel at the moment, so I tried a close substitute. I used a 1″ firmer chisel and held it at a skew with the bevel down. Nice shavings started streaming off and I could see a smooth surface developing in front of me … then a dig…oops caught an edge…then more smoothness, then a dig… I was getting better at this. I started making sense of climbing and falling cuts. This was working.
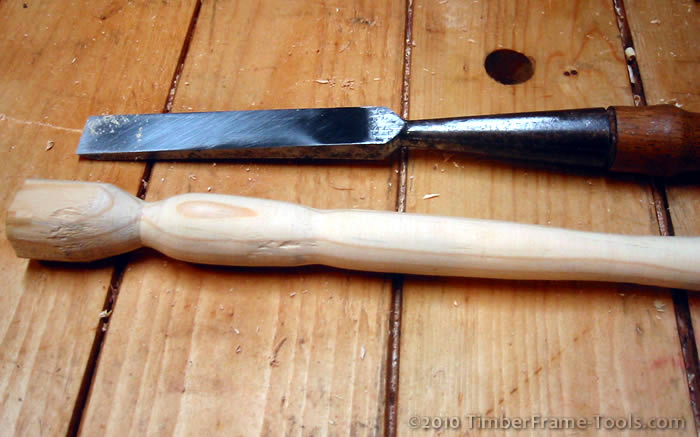
Better results the second time with a straight piece of wood and a chisel.
So now I am off to order a skew chisel and a spindle gouge. So many choices, so much to learn, perhaps a Turning Basics DVD would help? A lot of turners recommend scrapers, but it is my understanding that those don’t work well on spring lathes as the rotation is relatively slow and spins back and forth. This really is a lot of fun and I think I am going to enjoy turning more than I originally intended.
Bungee Lathe Parts List
- 2 Bolts 5/16″ diameter 4″ long and 4 matching nuts
- 2 fender washers that match the diameter of the bolt
- 2 pieces of 2″x4″ that are ~11″ longer than the depth of your bench. (Longer will let you turn wider stuff.)
- 1 piece of 2″x4″ roughly 4′-5′ long to act as the treadle.
- 2 sections of 3/4″ pipe for the pipe clamps. Length will determine the maximum length of the piece you can turn.
- 2 complete pipe clamps and the tail piece (the part that slides) of an additional pipe clamp. (1/2″ pipe clamps would likely work just as well)
- 4′ Bungee cord
- 2 screw eyes (3/8″ or larger in thickness) 2″ long
- 8′ of rope/cord 1/8″ nylon
- 1 snap clip like you would find on the end of a dog’s leash
- 2′ scrap of coarse sandpaper (to act as traction on the treadle.)
- 4 F-Clamps or other clamps capable of clamping a 2″x4″ on edge to your bench top.
Other Bungee Cord / Spring Pole Lathe Resources
- End Vise Pole Lathe by J. Alexander and Peter Follansbee – This is a great article with details about building a similar lathe but using an end vice for the tail-stock. It also contains tips for turning and specifically turning tool handles.
- Spring Pole Lathe by Christopher Swingly – A nice article showing the details of building a bungee lathe.
- Instant Bungee Lathe @ The Woodshop Bug
- Modern Medieval Build @ Badger Woodworks
- Another Spring Lathe Project with good ideas here
- Variety of designs from bows, to bungees here
- A free standing spring pole here
- If you want a smaller version, take a look at my Bungee Mini-lathe.
very cool!
Really enjoyed reading about this. I’ve been looking for a human-powered lathe that wasn’t quite as complicated to build as most I’ve seen.
You mention looking for round leather belting. I don’t know of a source for that, but I wonder whether the belting sold for treadle sewing machines would work. I bought a length of it from Lehmans in Ohio, but it’s probably available other places as well–someone who does sewing machine repair might have it. It has to be cut to the right length and then the ends butted together and sewn tightly, but once that’s done it works very well for a similar kind of treadle machine.
Thanks Liz,
This lathe is really easy to build and use (not including skills in using the various cutting tools, I’m still working on that a bit).
I imagine that leather sewing machine belting is exactly the kind of belting needed. The added benefit is that with this style of lathe, the ends of the belting would not need to be butted together. Just one long piece would work fine. I will have to give it a try.