I have contemplated the design of a dedicated sharpening station for over a year now. I have seen other examples of small benches used for this, and the idea made some sense. However, the thing that always struck me is that sitting out in a workshop a sharpening bench would get covered with sawdust and other shop debris over time that would limit its ability to work well. One idea I toyed with was a lift-top like an old style desk. Lift the top to get into the bench, do your sharpening, then put the lid back down to keep your sandpaper, ceramic stones, oil stones, water stones or diamond plates from getting covered with sawdust. I thought this would be a good solution…except that I know ME. I have a nasty habit of putting stuff on horizontal surfaces. If I put stuff on top of the lid to the sharpening station, then it would never be available when I needed it. I kept puzzling over the idea, turning it over in my mind to try to come up with a better idea.

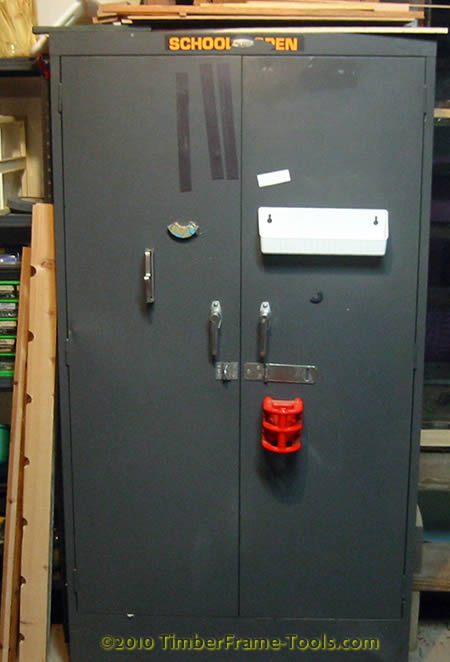
When closed, it looks like an ordinary 2-door metal cabinet.
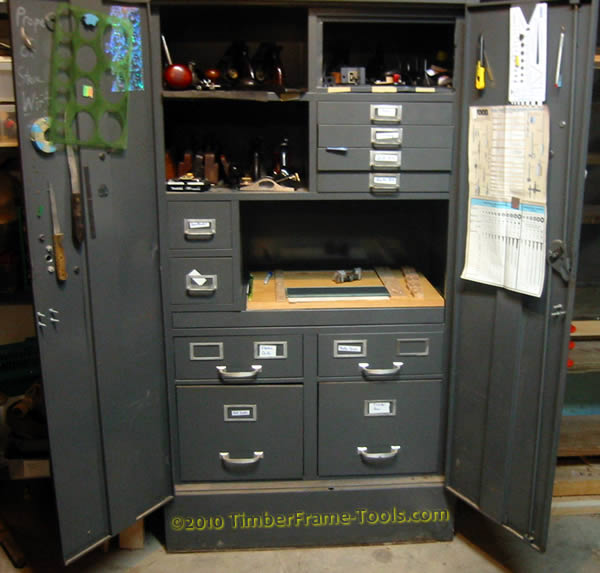
Fortunately, when I was digging through one of my tool cabinets the other day, serendipity struck me right between the eyes. I have this cabinet, that used to belong to my Mother. When she retired from teaching, she gave it to me for my classroom. When I left teaching, it came to my workshop where its shelves and drawers have become the home to many of my tools. I dropped a drill bit in the cabinet the other day and it rolled behind something I had on the large shelf. When I went to reach for it, I noticed that the shelf moves … it slides forward on runners to make a little desk. It hit me immediately. This would be a great spot for a sharpening station.

The great arrangement of drawers and shelves makes this a great cabinet, but the slide out desk, makes it an awesome cabinet.
I keep many of my hand planes and chisels in this cabinet and I am already in the habit of keeping it closed to keep sawdust out. The sliding drawer makes it quick to get to my sharpening station, then slide it out harm’s way when I am done.

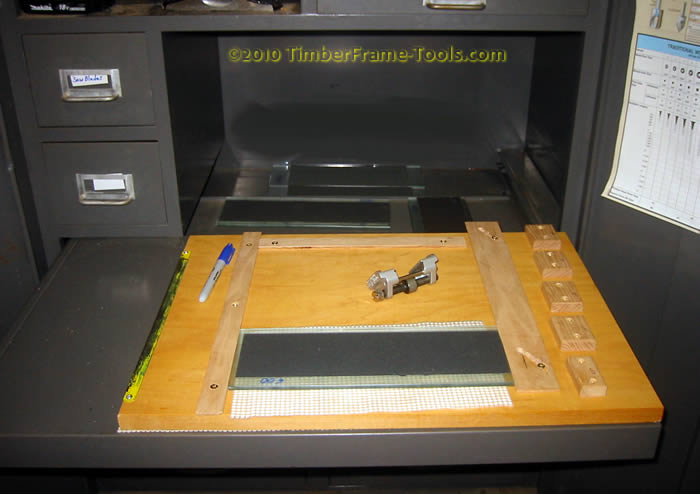
The shelf slides out to form a desk. Check out the storage for sharpening plates toward the back.
I use wet/dry sandpaper glued to glass plates as my method for sharpening. With the desk slid out, there is actually storage places for four glass plates. It is great to have a safe place to put them when those are not in use.
The desk is too short to work at while standing, but it works out perfectly when I sit on my sawbench. I can sit and sharpen, then slide everything back in and close up the cabinet to keep the sawdust off it.
The cabinet was made by Cole Steel Equipment and is at least 35 years old. I wish I had a source for new ones.
Sharpening Station
The sharpening station itself is not mounted to the desk. If needed, I can move it to another bench. I put a piece of rubber router mat / drawer liner between the plywood and the steel desk. This prevents sliding and helps reduce the noise.

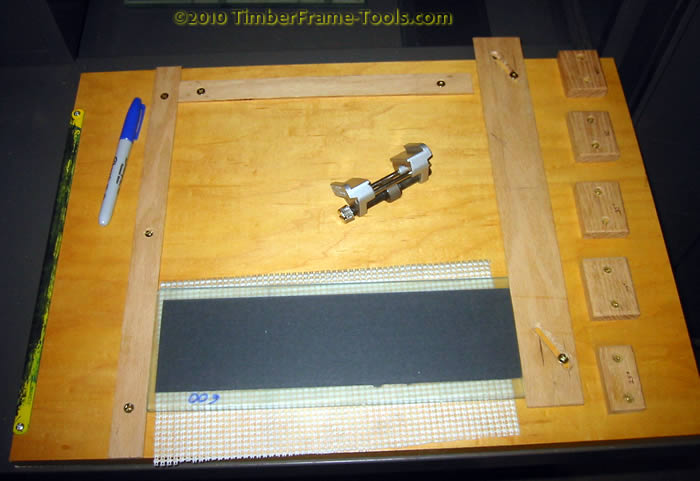
This sharpening station includes clamps my sharpening plates, provides an alignment jig, and a cutting blade for cutting the sandpaper.
The clamping station itself is made from some 3/4″ plywood. It uses 3/8″ thick oak strips to provide the stops that hold the glass plates or oil stones. The strip on the right has two grooves that the screws ride in. Sliding it toward the back causes it to wedge the sharpening plate in place. The hacksaw blade on the left extends just past the edge of the plywood. I can line up a sheet of sandpaper against the wood stop and then tear it straight using the edge of the hacksaw blade as the cutter. It cuts the right width for the glass plates I use.
The other stops on the right are used to obtain a variety of angles when setting the blades in my roller jig. I got this idea from an article in Fine Woodworking (#213 -July 2010). These depths work for MY sharpening roller guide, yours may need something different:
- 25° – 2-1/8″
- 30° – 1-5/8″
- 35° – 1-5/16″
- 40° – 1″
- 45° – 13/16″
With the exception of the screws holding the hacksaw blade in place, all screws are brass, and are countersunk to avoid contact with any edged blade.
Since building this a month ago, I have been amazed at how fast I can put a new edge on a tool and get back to work. I no longer waste time getting the sharpening equipment out, then putting it away again.
Related Sharpening Station Info
- Get Sharp Fast article from Fine Woodworking Magazine (membership required) Issue #213
- Sharpening Bench plans from Fine Woodworking
- Sharpening Station description at The Renaissance Woodworker
- A nice collection of various Sharpening Benches at LumberJocks