In the last post I showed off some newly made socket chisel handles and justified the use of octagonal shaping on the back section. If you liked the finished product and wanted to see how I made them, then this post is for you. Ideally, if I were some kind of master sculptor I could just envision the shape I need within the blank, and turn it by eye and intuition, but that would not end well. I need repeatability.
I started with a pattern from a chisel handle I liked. Since I was planning to make several handles, I transferred the length marks onto a piece of thin wood scrap (cardboard works well too). The marks indicate the position of the socket tenon shoulder, the maximum rise at the hilt, the start of the flat region, and the end of the handle. I sketch in the socket tenon just so I visually remember which end is which. Each socket is different so the actual length of the tenon will be different, and can not be made part of the template. The template is just for marking the lengths, not the diameters.
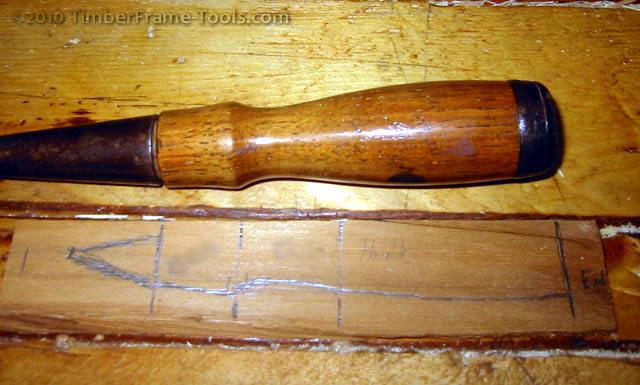
The lines on the template indicate the various key points in the handle. I use the template because the flat surface makes it easier to hold to the blank on the lathe and transfer the marks to the blank.
Determining the size of the chisel socket
To get the maximum diameter of the inner portion of the socket, I simply use the interior measure tines on my calipers. I then use the outside measure of the calipers to gauge my work with the parting tool while I turn the widest part of the tenon.
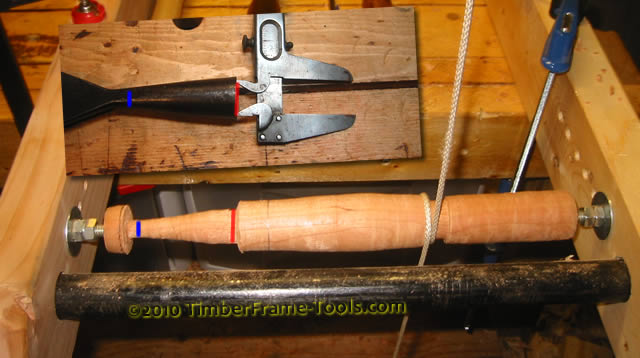
This is the quick and easy way to transfer the maximum diameter of the socket, to the shoulder cut with the parting tool on the tenon.
The red line in the photo above indicates the maximum diameter of the tenon, and the blue line indicates the minimum. For my method, the minimum diameter is always the same diameter as a pencil eraser. Why a pencil eraser??? Because I use a pencil eraser to measure the depth.
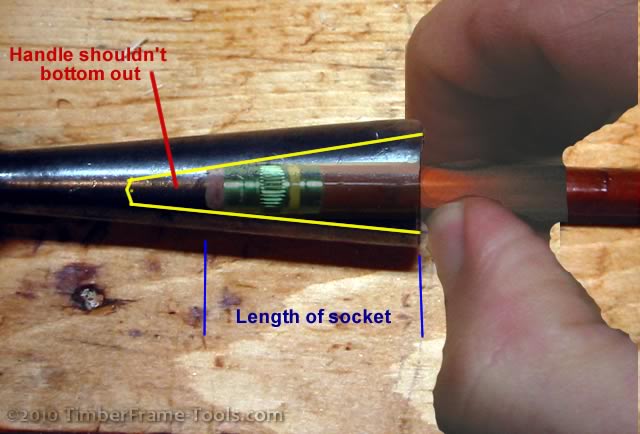
It is important that the tenon does not bottom out in the chisel socket. If it bottoms out, it prevents the handle from getting any tighter if the handle shrinks.
I use a pencil eraser because it takes a depth measurement of a specific measurable diameter without going all the way to the pointed bottom of the socket. In designing the tenon for the socket, it is very important that neither the tip of the tenon nor the shoulder of the tenon be allowed to bottom out. If either of them bottom out, then the handle can’t be driven into the socket any deeper. If they can’t go any deeper, then they can’t get any tighter if their is any seasonal contraction of the wood or crushing of the wood fibers during heavy use with a mallet. With the length of the tenon measured with the pencil, I transfer that length to the blank and use the parting tool to turn down to the diameter of the eraser. I then use the skew chisel to cut a tapered tenon that goes from the cut shoulder to the tip. I leave it just a touch over-sized in diameter so that I can use a wood file or fine rasp to custom fit it into the socket. Sometimes the sockets are not symmetrical so some hand adjustment with a file is always needed.
Then next step is to use the parting tool to bring down the diameter of the tenon shoulder to match the outer diameter of the socket. This makes it so there is a smooth transition from the wood into the metal.
Shaping the Chisel Handle
Once the rest of the handle has been roughed down to the desired diameter, I start cutting in the overall shape that I want.
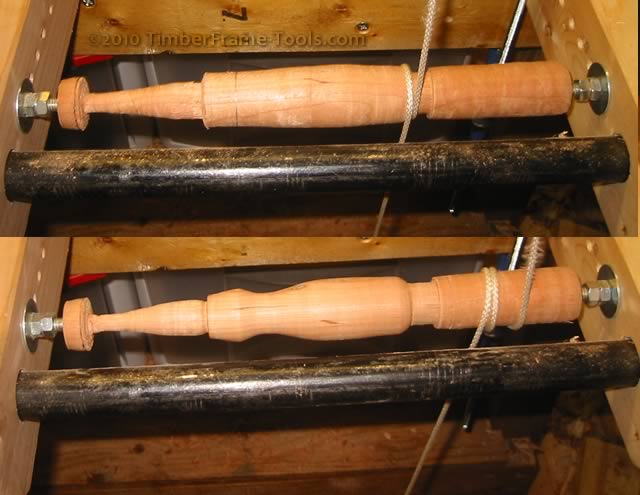
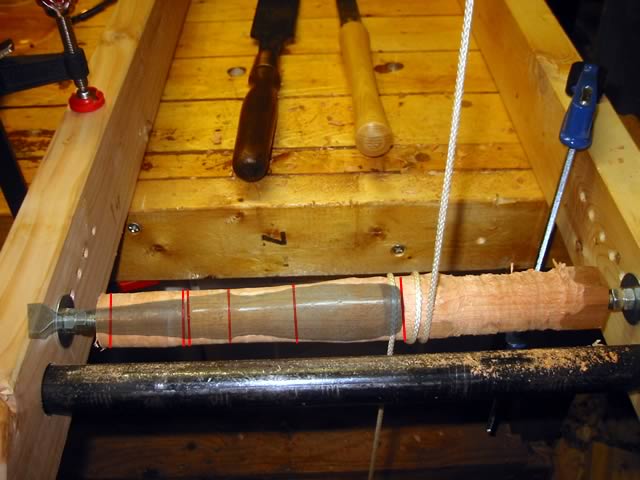
Here is the piece as it goes from rough to more contoured. Because I am using a bungee lathe, I need extra length on the handle for the cord to wrap around. I use these extra bits as file handles.
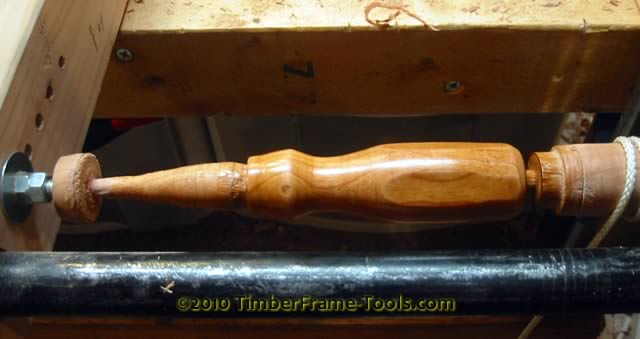
I cut in the key diameters with the parting tool, then I use a roughing gouge and a skew chisel to get the shapes I want. Once I have the shape I want, I turn to some sandpaper on the lathe to smooth out some of my transitions. Then I switch to the green and finally the gray sanding pads. Then put some shavings in my hand and hold them to the spinning handle to burnish it. I love watching the shiny smooth surface appear. Most could stop here and wipe on a finish of choice, but I wanted octagonal flats, so I wasn’t finished yet.
Making the octagonal flats
I wanted the barrel section of the chisel handle to have octagonal flats for comfort and control. In truth, I don’t need to cut octagonal flats. Since the handle is already circular in cross section, I can approximate an octagon by just cutting four flats on the circle.
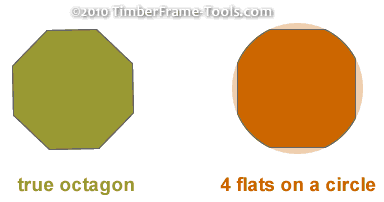
By making 4 flats on a circle I approximate an octagon. The rounded transitions from one flat to the next are really quite comfortable.
I experimented with a few methods of cutting the flats. I used a block plane, a spoke shave and a card scraper. All worked just fine. Of the three methods, I favored the card scraper. It was the most forgiving of grain direction and it followed the contour of the handle along its length which made the resulting flats feel a bit more natural. I simply clamped the handle my vise with one side of the handle facing up. I always looked for any region of tear-out from the lathe and chose that to be face up. This assured the defect was removed. I would then use the card scraper to create the first flat. When the flat was the width I wanted, I turned the handle so that the flat rested firmly against the face of the vise, and scraped in another flat on the part of the handle that was facing up. Repeating those steps 2 more times results in four flats that are equally spaced around the circular handle. In a couple cases I had to sand a bit of roughness out, but usually the scraper left a smooth surface.
I then returned the handle to the lathe (I had not cut the end bits off yet) and spun the handle round while holding a grey sanding pad up to it to finish sand the flats and round over the corners just a bit. Another bit of burnishing with some shavings in my hand as I pumped the foot treadle up and down and the entire handle came back with a sheen. To finish off the handles I applied a few quick coats of amber shellac while it was still on the lathe.
After this step I remove the handle from the lathe and cut loose the handle with a flush cut saw. I use a wood file to file down any remainder of the stump on the end of the handle. Forcing the tenon into the chisel socket and turning it a bit, leaves tell tale black marks on the tenon and indicate where filing must be done. Repeat the test fits and filing until the handle seats deeply and securely but still leaves at least a 1/8th of an inch between the socket and the tenon shoulder when fit by hand. A few whacks with a mallet will quickly shrink that to 1/16th of an inch.

It sounds like slow work, but a good file can fit a tenon to the socket in a very short amount of time.
If by chance you over-file and end up with the shoulder snug up against the socket, use a file to cut the shoulder back a bit and take the same amount off the tip of the tenon. Again, neither the tenon shoulder nor the tip of the tenon should bottom out in the socket.
A well made chisel handle should fit securely and be comfortable to use. If I was making handles for chisels that need to stand up to heavy bashing, then I would consider putting either leather washers on the end, or a brass or iron ferule to help hold the handle together.
Safety warning: If you aren’t already in the habit of carrying your socket chisels by the socket, make it a habit (something you do without thinking). This way you can be certain the iron won’t fall on your foot while the wood handle remains in your hand.
Resources for making new chisel handles
- Bob Smalser on rehabilitating old chisels including making handles without a lathe and making a leather washered chisel handle.
- James Thompson at wkfinetools shows the process of making socket handles or tanged handles for a chisel and a lengthy post on making nice chisel handles complete with bronze ferules.
- Tanged and socket handle tutorials on the NorseWoodsmith.
- Derek Cohen re-handling an oval bolstered mortise chisel (pig sticker).
- Re-handling modern chisels at Popular Woodworking
Details of either the full size bungee lathe or the mini-bungee lathe.
<< 1 2

This is very nice. I have a lot of chisel handles to make, which I should get to soon. Thanks for the instruction.
Nice work.
After seeing some of Jim Thompson’s handles on Galoot Central. I decided to try my hand at it.
It is a lot of fun and I brought back my fathers old Buck Brothers chisel to useful life.
Easy way to fill an hour or two of shop time after work.
Thanks David, Glad to hear you are enjoying making handles too. There is pleasure in the making and in the using.